- Bill Rate and Pay Rate Overview
- How to access Bill Rate & Pay Rate information
- How to Edit/Add existing Bill Rate and Pay Rate in a placement
Bill Rate & Pay Rate Overview:
Bill Rate is the rate at which we would invoice the client for a consultant who is placed on project and Payrate is the rate at which we pay to the consultant or to the Sub Vendor (If C2C or 1099).
Rates module in Conrep allows users to track changes in rates based on date, so that when we invoice a client or pay the Vendor/Employee the calculations are accurate.
The calculations are important as the margins and profitability numbers are dependent on rates mentioned in placement.
How to access Bill Rate & Pay Rate information
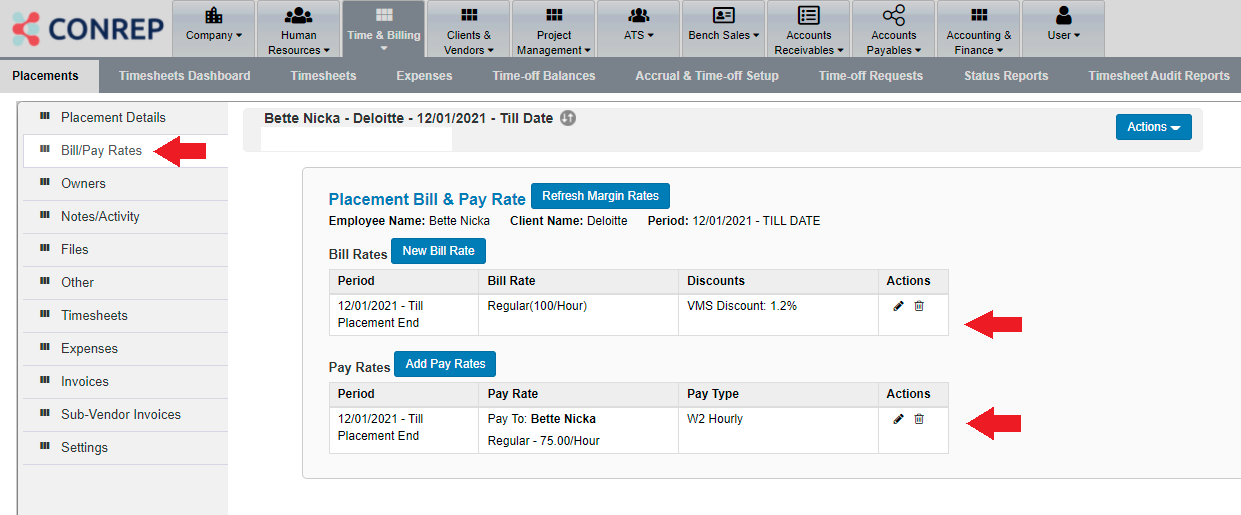
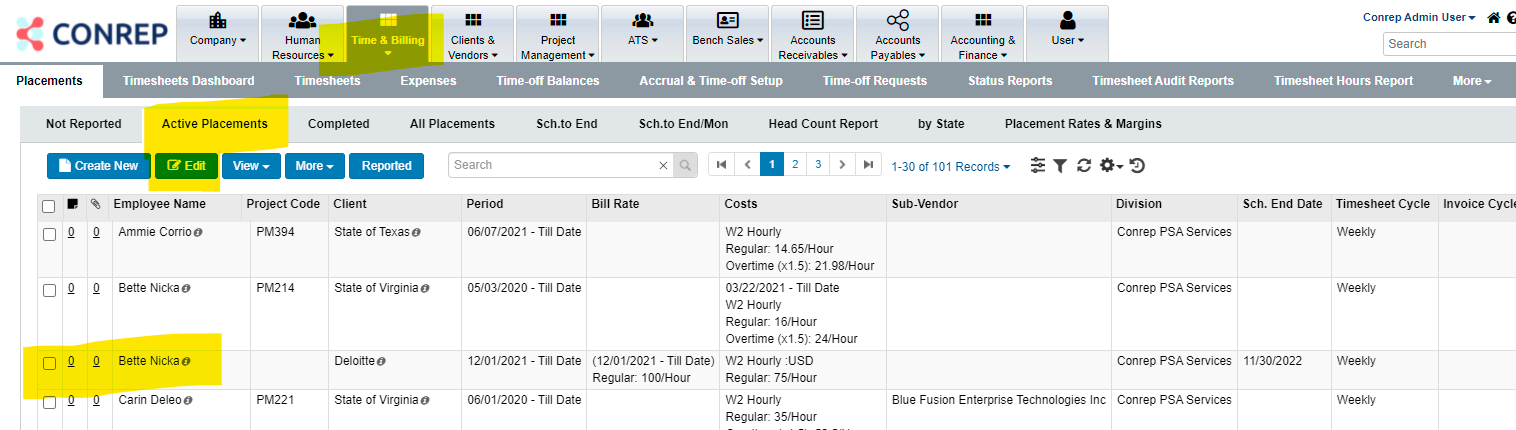
Bill Rate and Pay Rate are placement specific, so we need to go to Time & Billing -> search for the candidate ->Select the record -> EDIT -> Click on Bill Rates and Pay Rates TAB.
You can also, access placement records from Workforce à Employee Record (display screen)à Placement TAB-> EDIT Placement Record-> Bill & Pay Rates Tab.
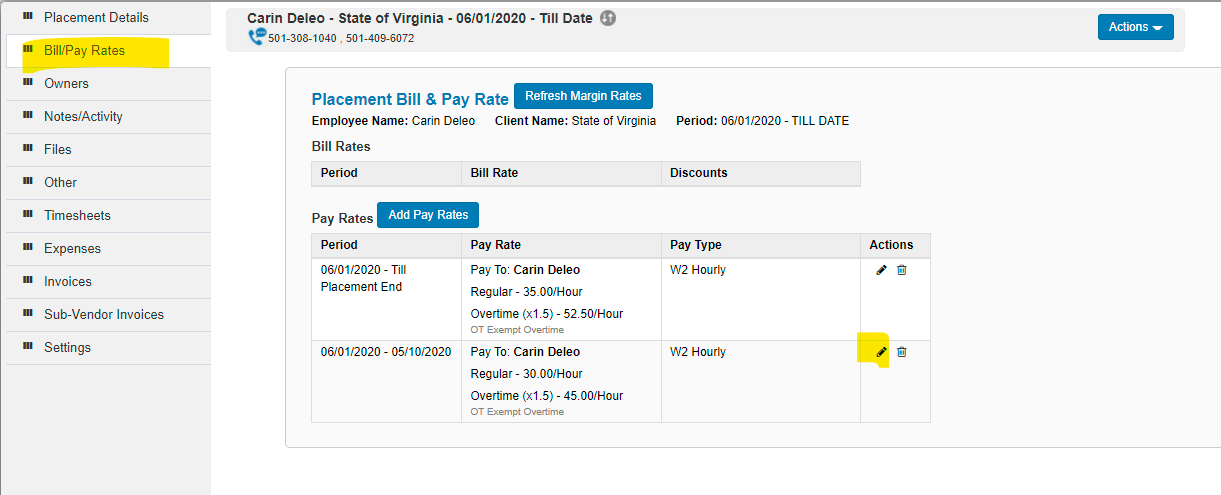
How to Edit existing Bill Rate and Pay Rate in a placement:
You need to be access the Bill Rate and Pay Rates Pay from the placement display screen.
If the Rates are already mentioned, you can edit the Placement to make changes to the Pay type, Rate or add OT or DT Rates, if it’s not been mentioned earlier.
Please note, if we have New Bill Rate or Pay Rate, do not use the EDIT Option rather use the Add bill Rate/Add Pay Rate Button.
Using the Add Bill Rate/ADD Pay Rate option the system will update an end date to the existing Rates record and add a new Rates entry with the current Date (Effective Date of the New Rate)
VENDOR INVOICING PROCESS
Sub Vendor Billing Process:
- Sub Vendor Invoicing Overview
- Add New Sub Vendor & Sub Vendor Contact
- Issuing Vendor Self Service Portal logins for Sub Vendor contacts
- Conditions for Sub Vendor Invoice creation
- Creating Sub Vendor Invoice Setting record
- Tagging Workforce & Pay Rate parameters to generate Sub Vendor Invoices
- Sub Vendor Invoices workflow & Email triggers for Sub Vendor Invoicing process.
- How to fix Sub Vendor Invoices and regenerating Invoice PDF.
- Payments
- Aging Report
Sub Vendor Invoicing: Overview.
All employees hired on C2C or 1099 would be considered for Sub vendor Invoicing from staffing perspective, we can also generate invoice for any Vendor you might need by creating a Manual invoice. The Automation of Invoice creation is based on Timesheet Approved hours and Invoice Setting. Invoice Setting is where we define how the Invoices are to be automated with different parameters like Payment Terms, Invoice Cycle etc.
When it comes to One Time Fixed Payments for Vendors, we recommend to process a Manual invoice in the system.
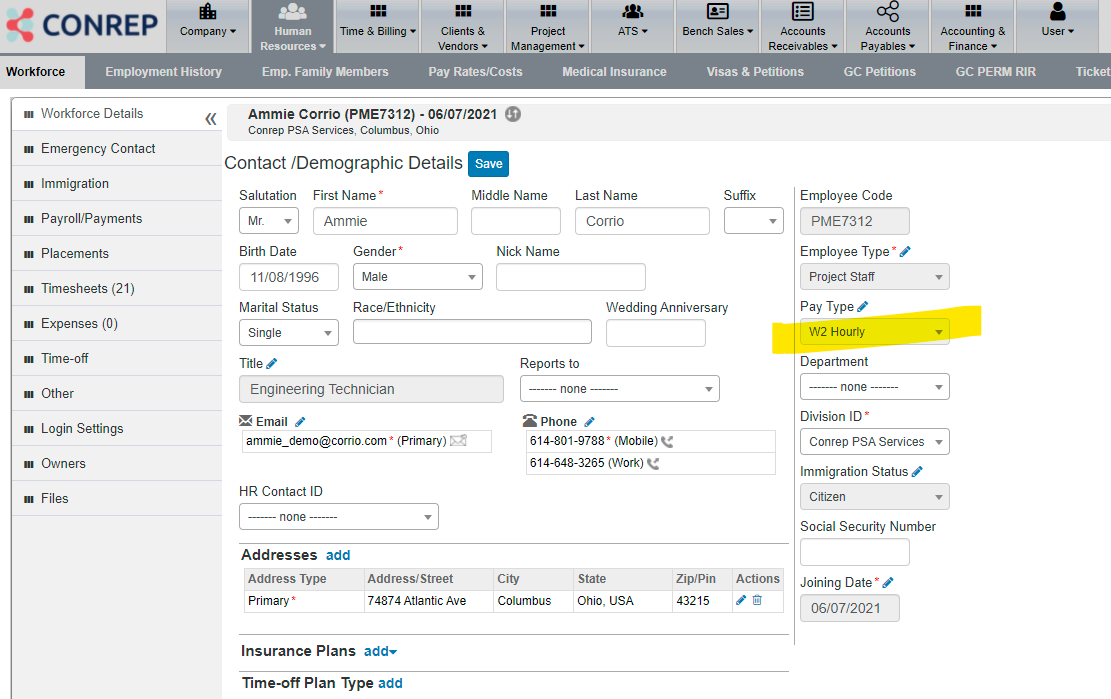
Employee records who are marked as Employee Type “Project Staff” and Pay Type as C2C or 1099 will need to tag Vendor information when we update placement & Pay Rate details. It is mandatory for Vendor Invoice generation.
Vendor and vendor Invoice Type is mandatory when we you track Pay Rate details for a consultant who is a C2C or 1099 based on which the Invoice will be created.
Please refer to the screenshots below to see where the Pay Type is set to C2C or 1099 in workforce and vendor and Vendor Invoice Type is set in placement Pay Rate details.
Workforce:
Placement:
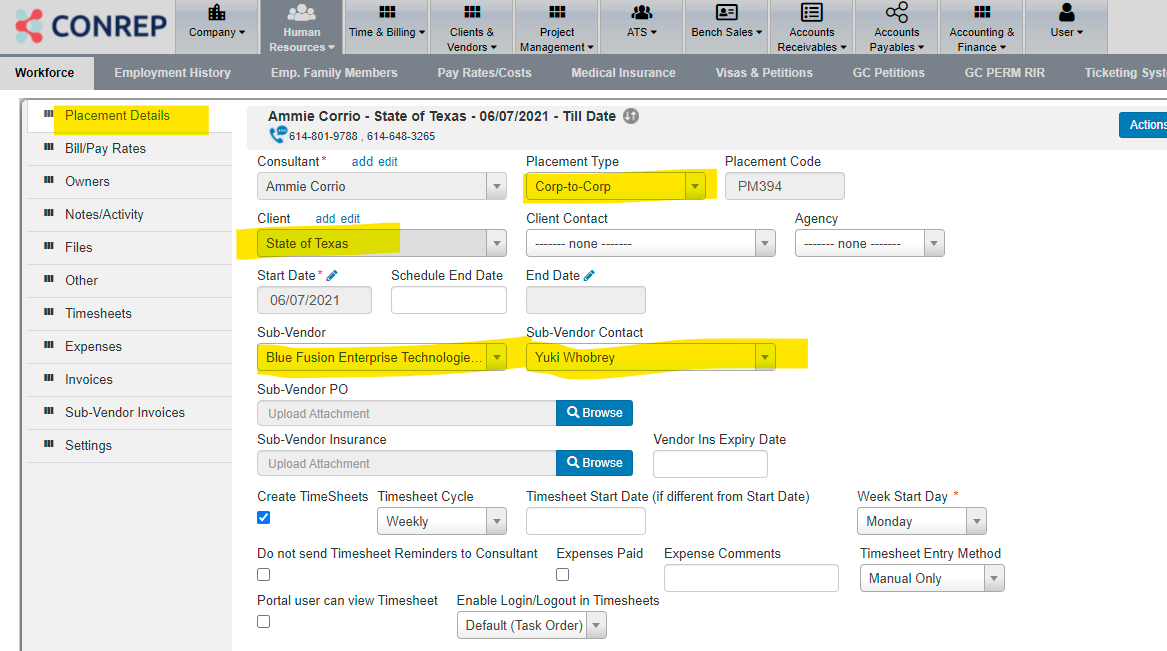
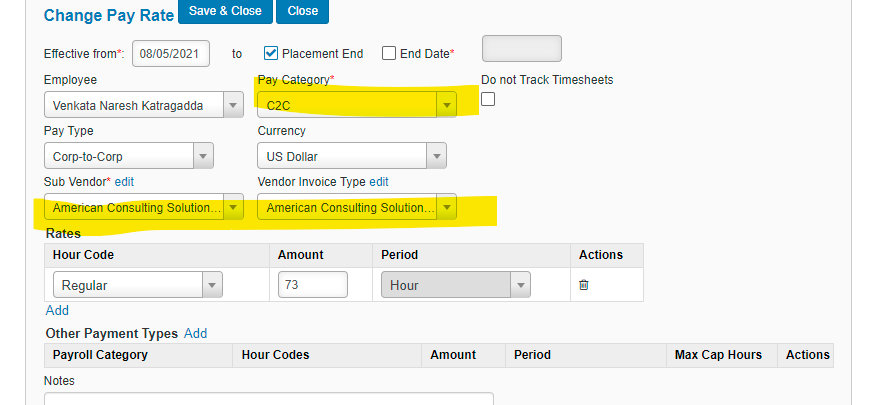
Pay Rate Details:
Adding a new Sub vendor & Sub Vendor Contact:
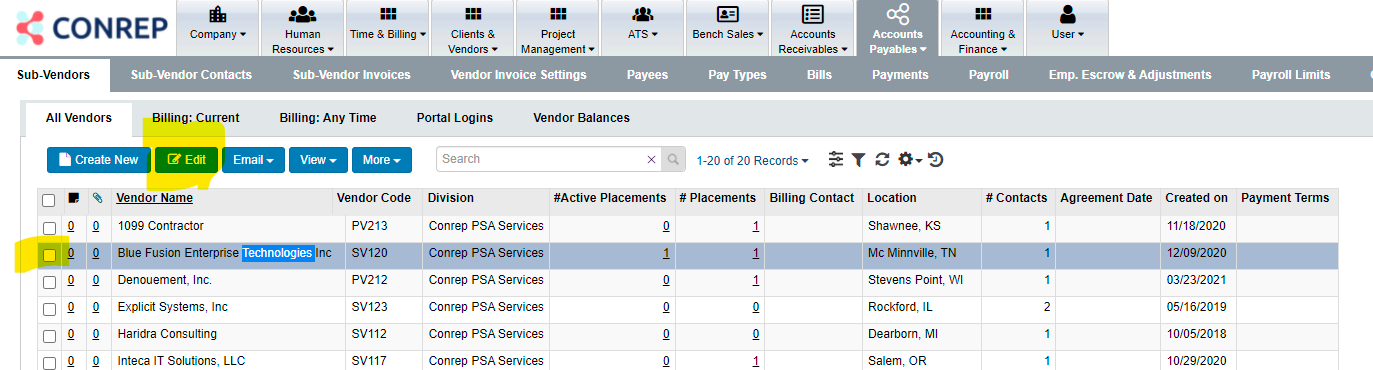
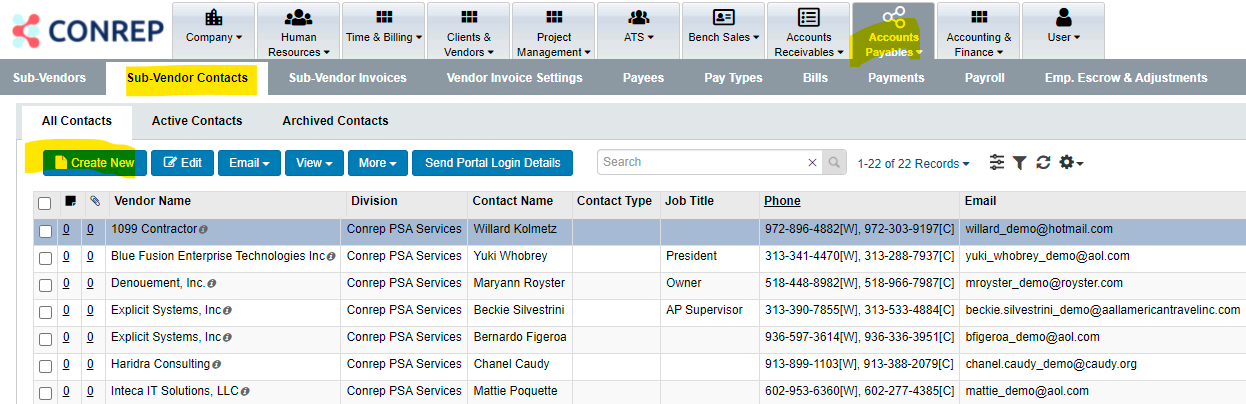
Adding a Sub Vendor and Sub Vendor contact options would be available on both ATS and PSA menu. PSA menu is assigned to AP team and the Option to add new records would be under Accounts Payable (Main Menu)
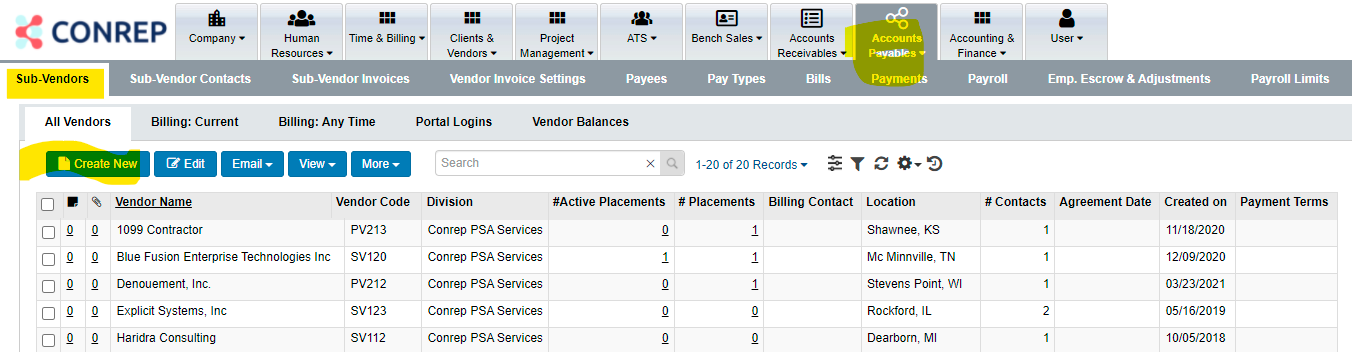
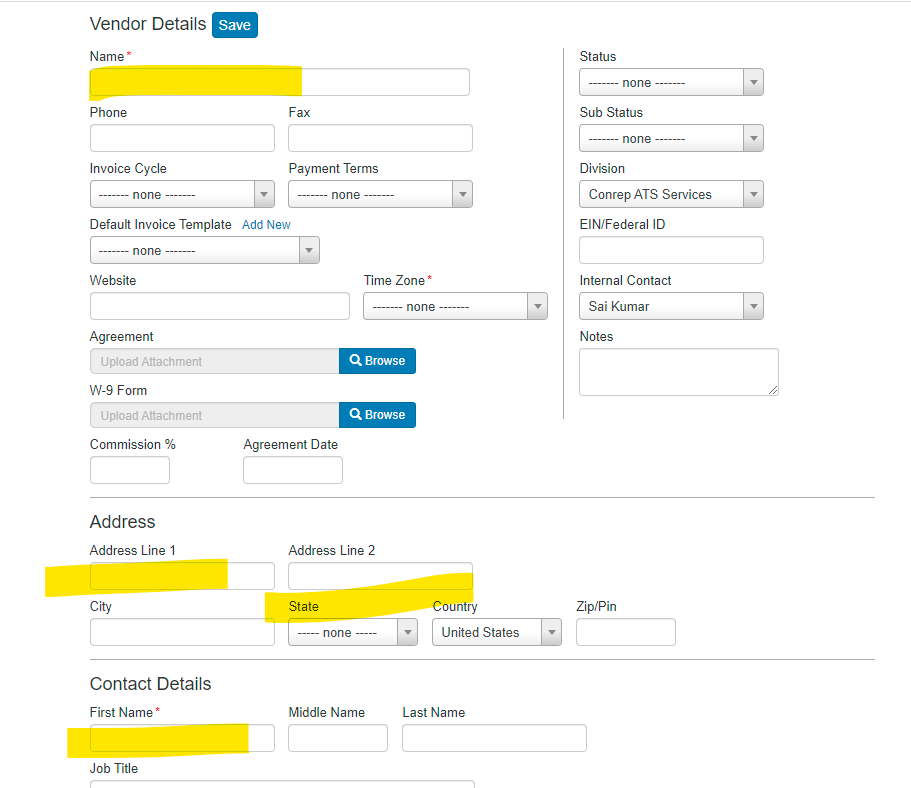
“Create New” would give you options to enter Sub Vendor details and also a Vendor Contact information.
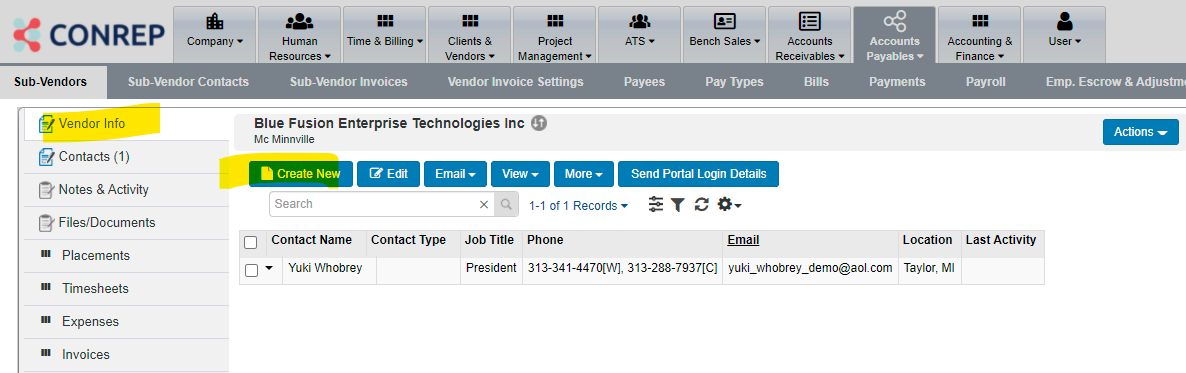
To add just a Vendor Contact to an existing Vendor, you can edit a Vendor record, click on Contacts TAB on the left panel and Click Create New vendor Contact.
You can also add a vendor contact to an Existing vendor from Vendor Contacts option in the Main Menu.
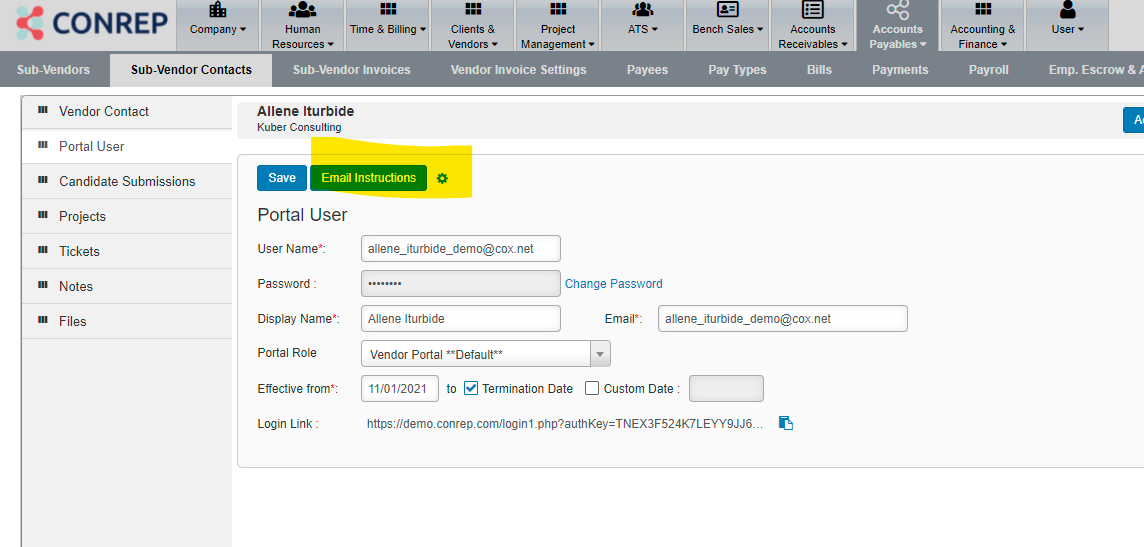
Issuing Vendor Self Service Portal logins for Sub Vendor contacts:
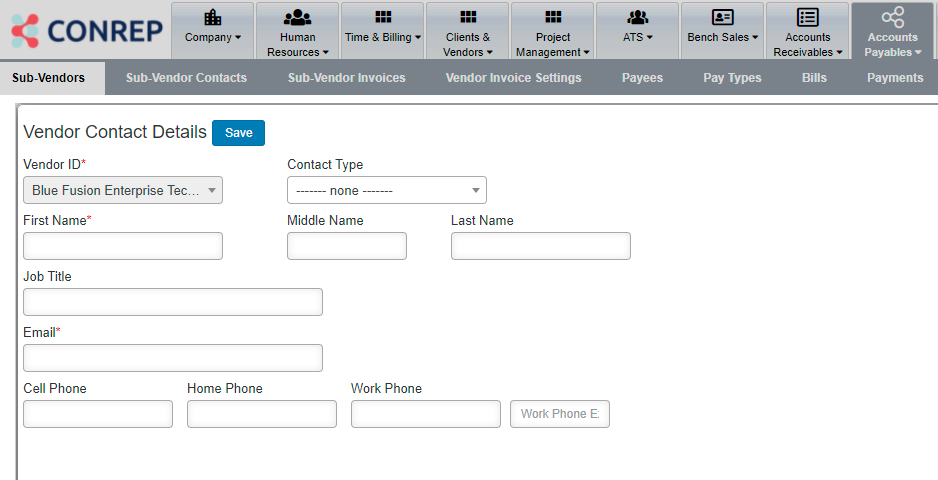
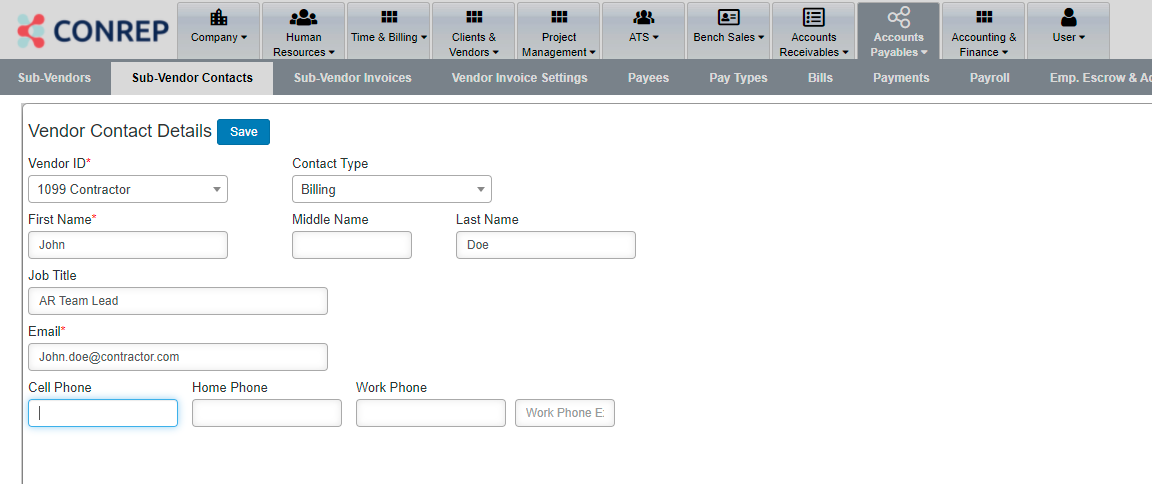
When you add a new vendor contact and Save the page, you will be directed to a display screen which will give you the option to create a Portal login for the user.
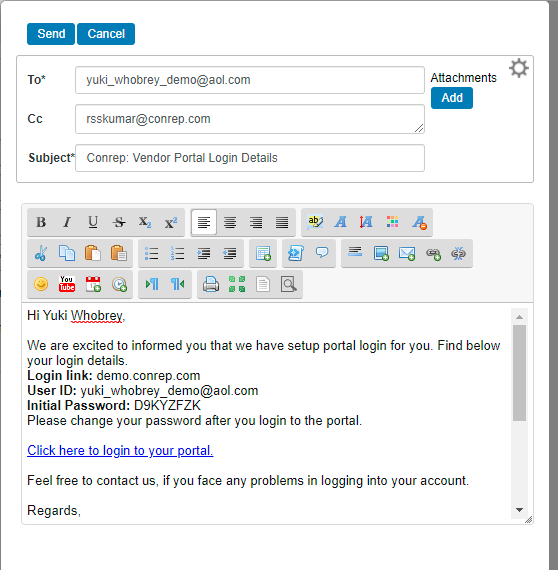
Click on Portal User TAB on the left panel à Click Create Portal User à send Email Instructions which will have portal login details.
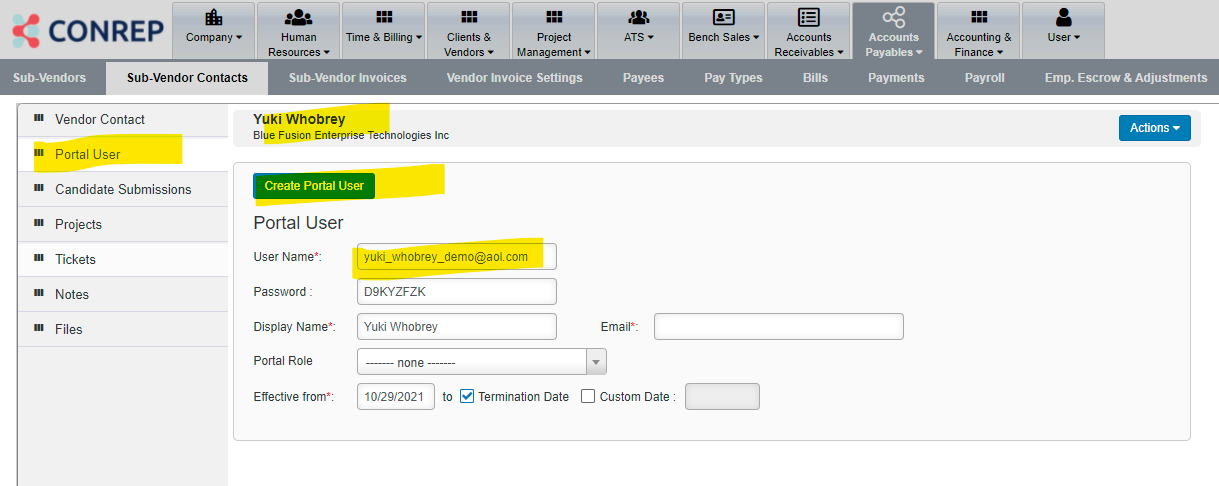
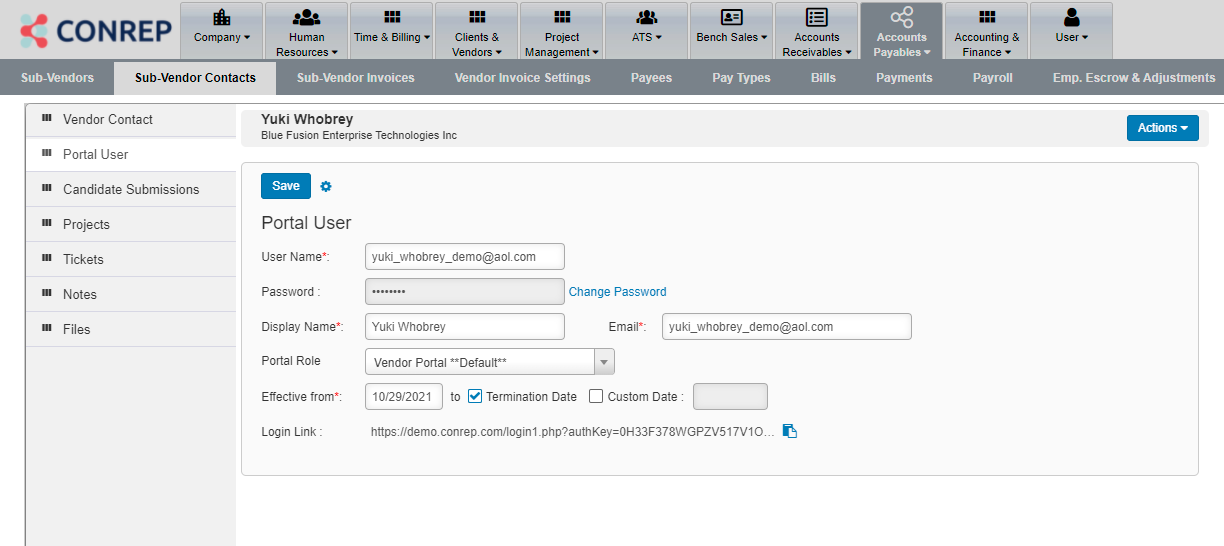
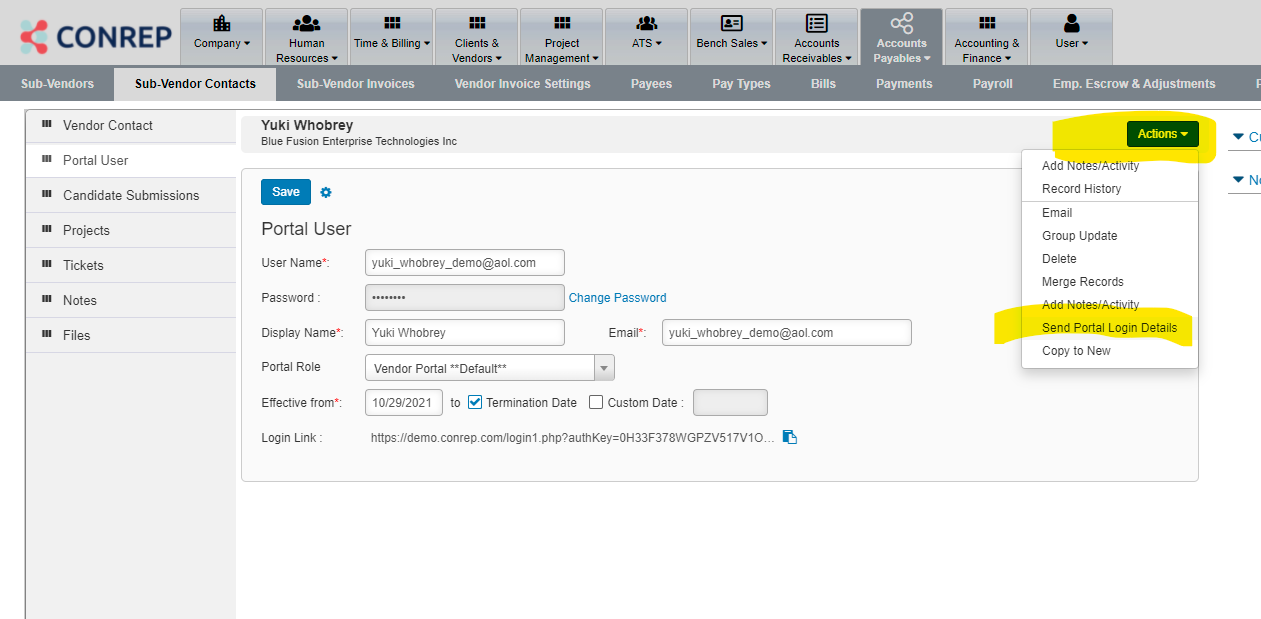
When you Save the Portal Record, you will also be able to email the Vendor with Login details using the Email Instructions Button.
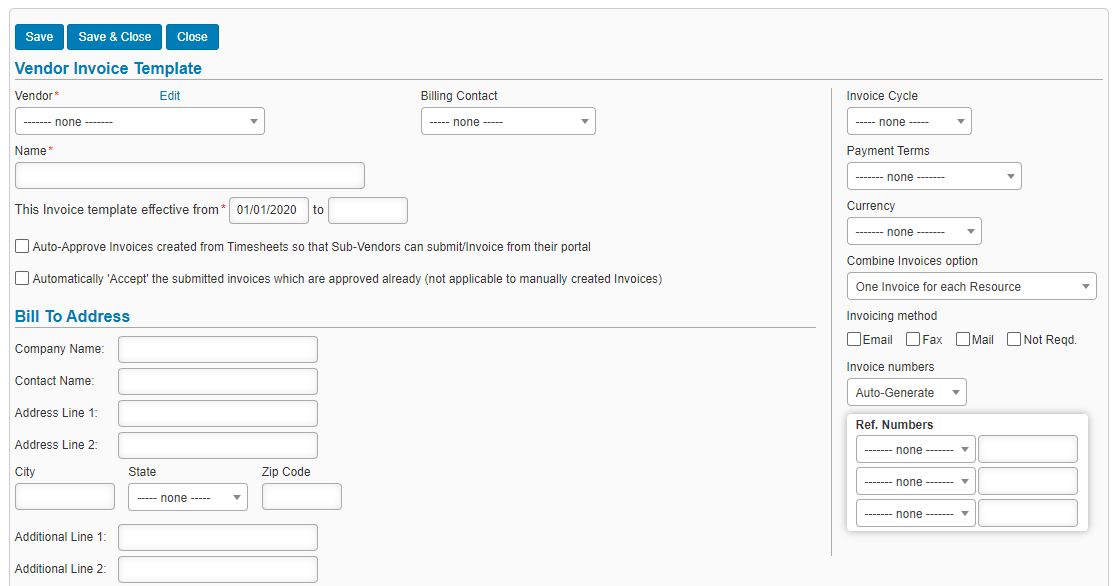
Vendor Invoice Type:
Every Invoice which is generated either manually or automatically would have different set of information Payable to details with company name, address, email and phone details. Remittance details, Remittance Memo which can include ACH Details or any information to the Payee. Invoice Cycle, Payment Terms, Invoicing Method etc.
| Field Name | Selection/Value | Suggestion | Mandatory |
| Vendor | Pick a Value in the combo | If you can’t find the vendor in the list, use add new vendor to add vendor and contact first | Yes |
| Vendor Contact | Pick a Value in the combo | Select Billing contact specific to the Vendor which is listed | Yes |
| Vendor Invoice Type Name | Text field to use any naming convention to identify the Invoice setting with the Vendor | When you have invoices to be created differently for the same vendor, you can use a different name to identify and associate with vendor | Yes |
| Invoice Cycle | Pick a Value in the combo | Invoice cycle as per the vendor MSA/PO | Yes |
| Payment Terms | Pick a Value in the combo | Payment Terms as per the vendor MSA/PO | Yes |
| Currency | Pick a Value in the combo | US Dollar | Yes |
| Combine Invoices option | Pick a Value in the combo | Depends on the vendor how the invoice generation is requested or default to one invoice for each resource | Yes |
| Invoicing method | Check Value | No | |
| This Invoice template effective from | Date entry | This date will be picked for invoice generation and will stop if an end date is mentioned | Yes |
| Auto-Approve Invoices created from Timesheets so that Sub-Vendors can submit/Invoice from their portal | Uncheck | Approval process if applicable when invoice is auto generated. | |
| Automatically ‘Accept’ the submitted invoices which are approved already (not applicable to manually created Invoices) | Check | When Invoices are reviewed through approval process, the submitted invoice would be accepted status | |
| Bill To Address | Please mention details of your Company | ||
| Line Item Settings | Pick a Value in the combo | Based on the selection the line item description would be visible | |
| Attach Timesheets option | Pick a Value in the combo | Based the selection, we can define if we need to attach Timesheet pdf on the invoice | |
| Attach Invoice File PDF | Check Value | If checked the Invoice PDF will be available for the vendor | |
| File Name format: | Tags based file format | Inv[[Invoice Number]]_[[End Date]]_Invoice | Use the one suggested, if changes required, contact support |
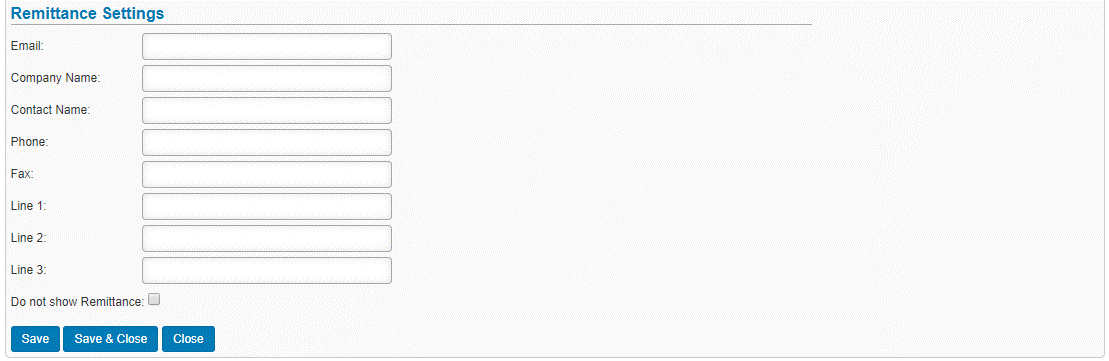
| Remittance Settings | Text Fields | Please update remittance address as per Vendor MSA/PO | |

New vendor Invoice Type for a particular vendor can be created from multiple screens:
- Accounts Payable (Main Menu) à Vendor Invoice Setting -> Create New
- Vendor (Edit screen) -> Add New
- Pay Rate Entry screen (Placement) -> Add New
For Sub Vendor Invoice Automation process, below set up is Mandatory:
1: Employee Record should have PAYTYPE mentioned as C2C or 1099
2: Placement Record should have PLACEMENT TYPE mentioned as C2C or 1099
3: Placement Pay Rate should have PAYMENT CATEGORY to be set to C2C and PAYTYPE to be set to CORP TO CORP, VENDOR NAME & VENDOR INVOICE TYPE tagged correctly.
4: VENDOR INVOICE TYPE record should have INVOICE CYCLE & INVOICE TEMPLATE EFFECTIVE DATE [refer Vendor Invoice Type Setting creation]
Sub Vendor Invoices workflow:
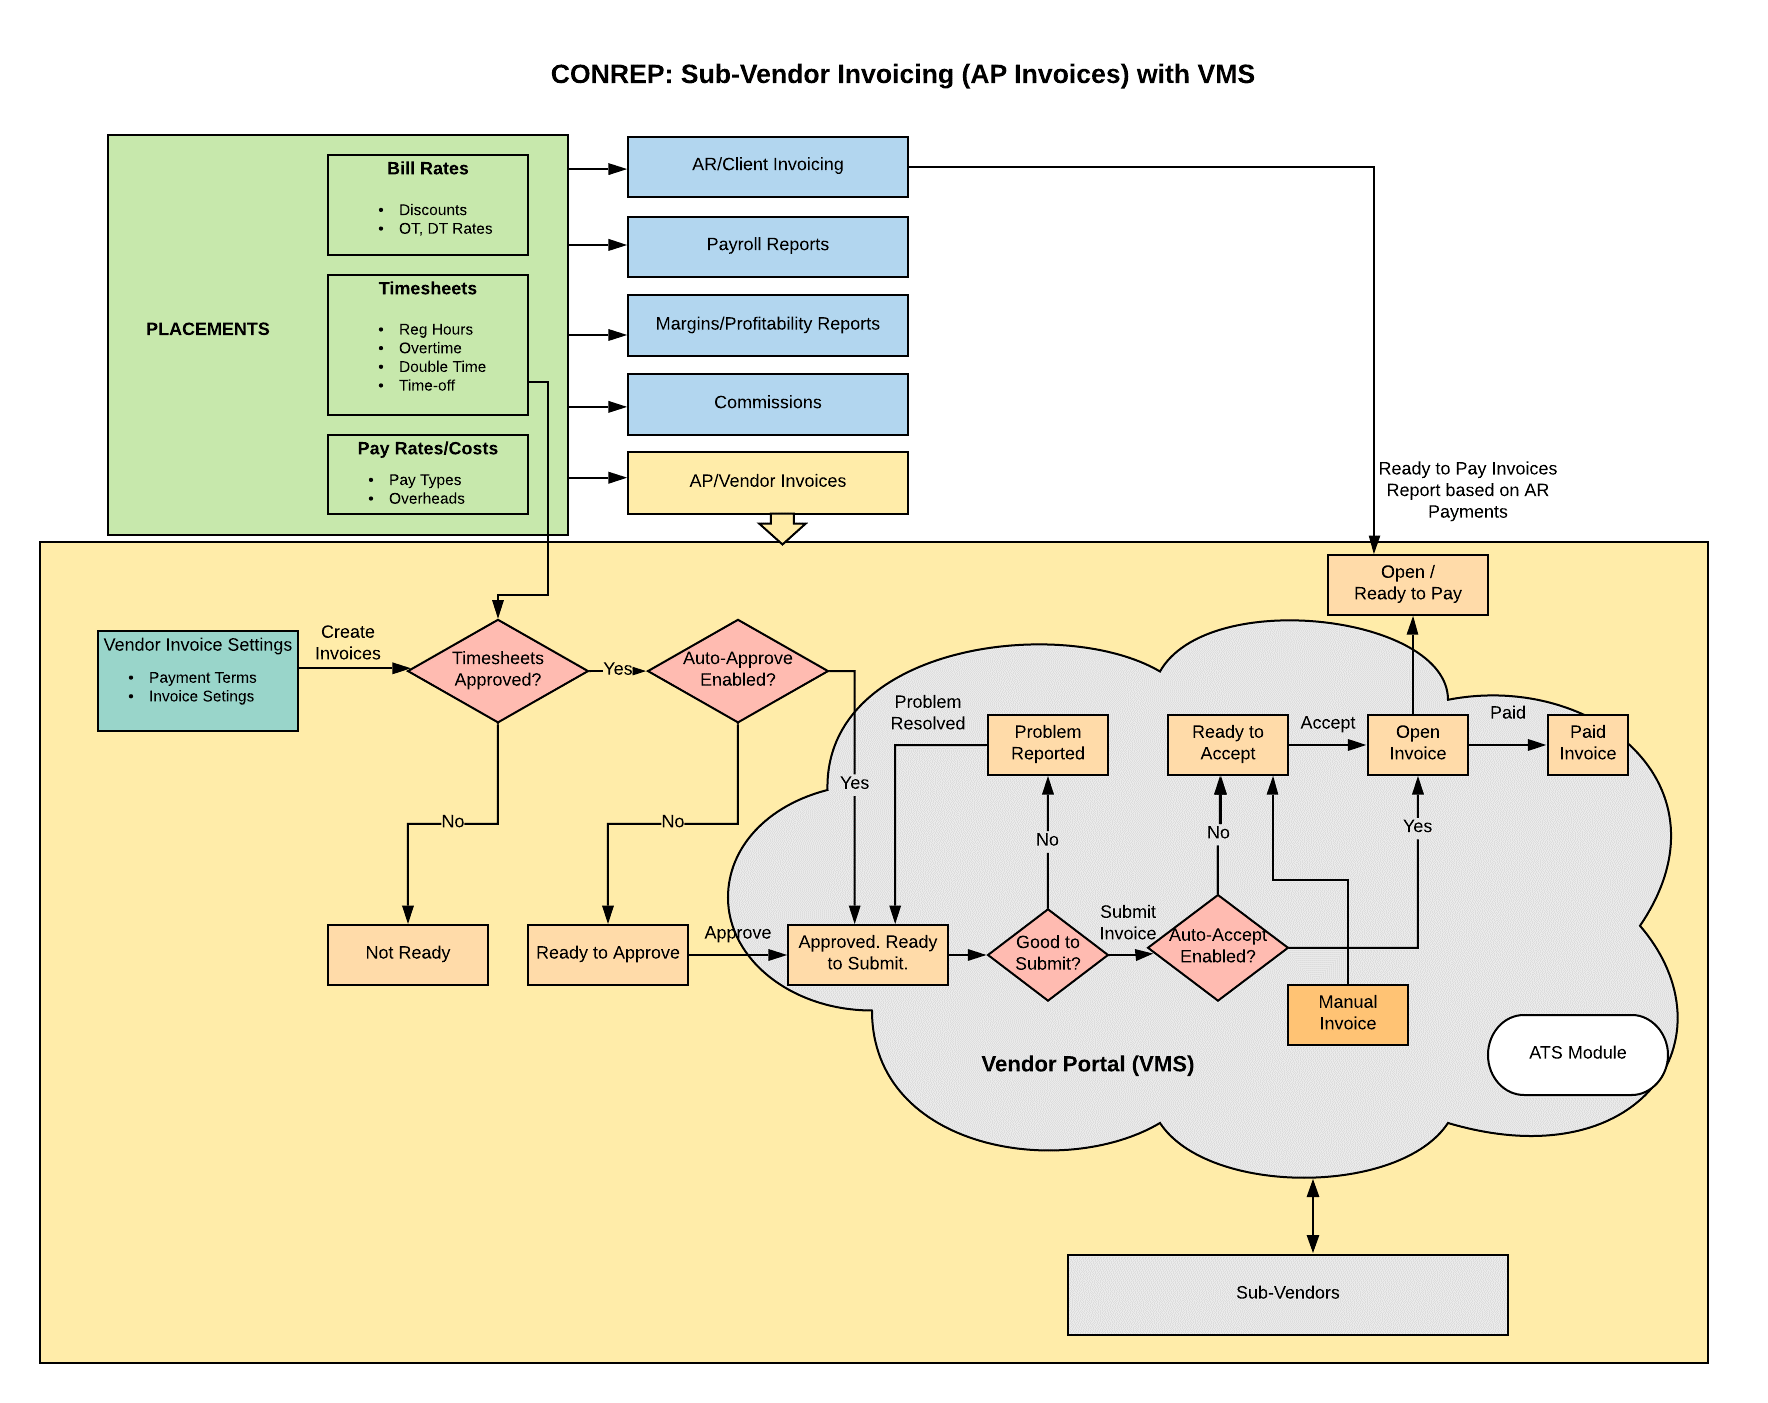
If the mandatory parameters mentioned for Invoice creations is adhered, vendor invoices will be automatically created. Based on the Timesheet status the Invoice status would be in either PENDING FOR APPROVAL or NOT READY.
If Timesheet for the vendor invoice period is not approved, the invoice will be NOT READY STATUS
If Timesheet for the vendor invoice period is approved, the invoice will be IN PENDING FOR APPROVAL.
When the Invoice from PENDING FOR APPROVAL is approved by accounts payable team the invoice status would be under READY TO SUBMIT.
When the status of the Invoice is changed to READY TO SUBMIT, email will be triggered to vendor to SUBMIT invoice.
If the Vendor agrees to the displayed Invoice Amount, he/she would attach their invoice or use the generated Invoice and mark as SUBMIT
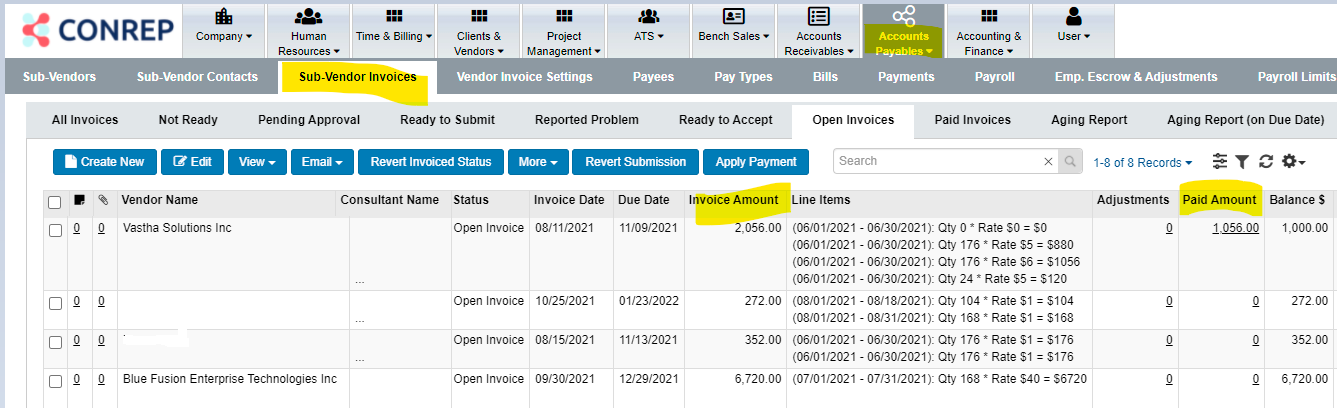
When Invoice is SUBMITTED, email will be triggered to your_ap_email_id @companydomain.com to process payment, the Invoice will appear in OPEN INVOICES.
When payments are processed, the payments are applied to the Invoice.
If the vendor has any concern with the invoice raised, the vendor will have an option to REPORT A PROBLEM. Email will be sent to Accounts Payable team with problem description. The invoice will be under REPORTED PROBLEM STATUS.
When the invoice concern is addressed, the Invoice is marked as PROBLEM RESOLVED, vendor will receive an email with the status change and the invoice can be SUBMITTED again.
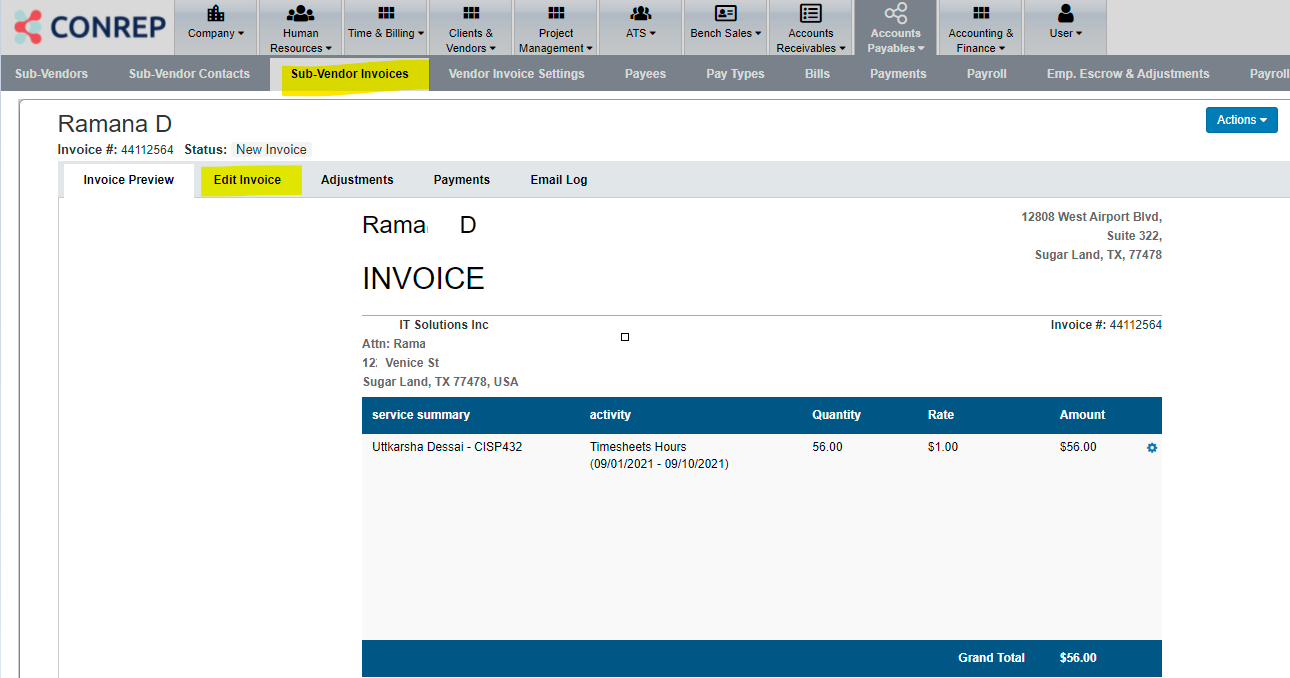
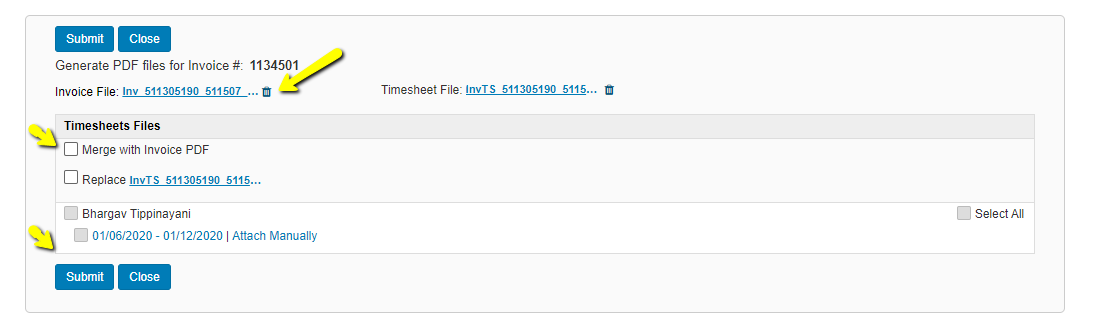
How to fix Sub Vendor Invoices and regenerating Invoice PDF.
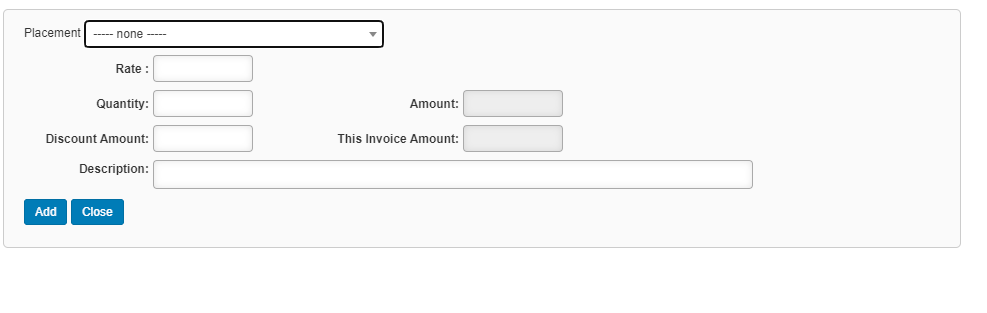
Adding line items to existing invoices would be available from EDIT INVOICE TAB from the invoice display screen.
Users can update RATE, QUANTITY, DISCOUNT AMOUNT & DESCRIPTION to add a new line item.
You can also change Invoice Date, remittance address, bill to details, PO reference, if any.
When making these change, make sure update all changes SAVE and them use Generate files to delete the PDF and re-generate the file with updated information.
Payments
When the invoice is PAID, you can apply payments to the paid invoices either in part or full. IF paid in full the invoice will be moved to PAID invoices and if partially PAID it would remain in OPEN Invoices and will show balance amount.

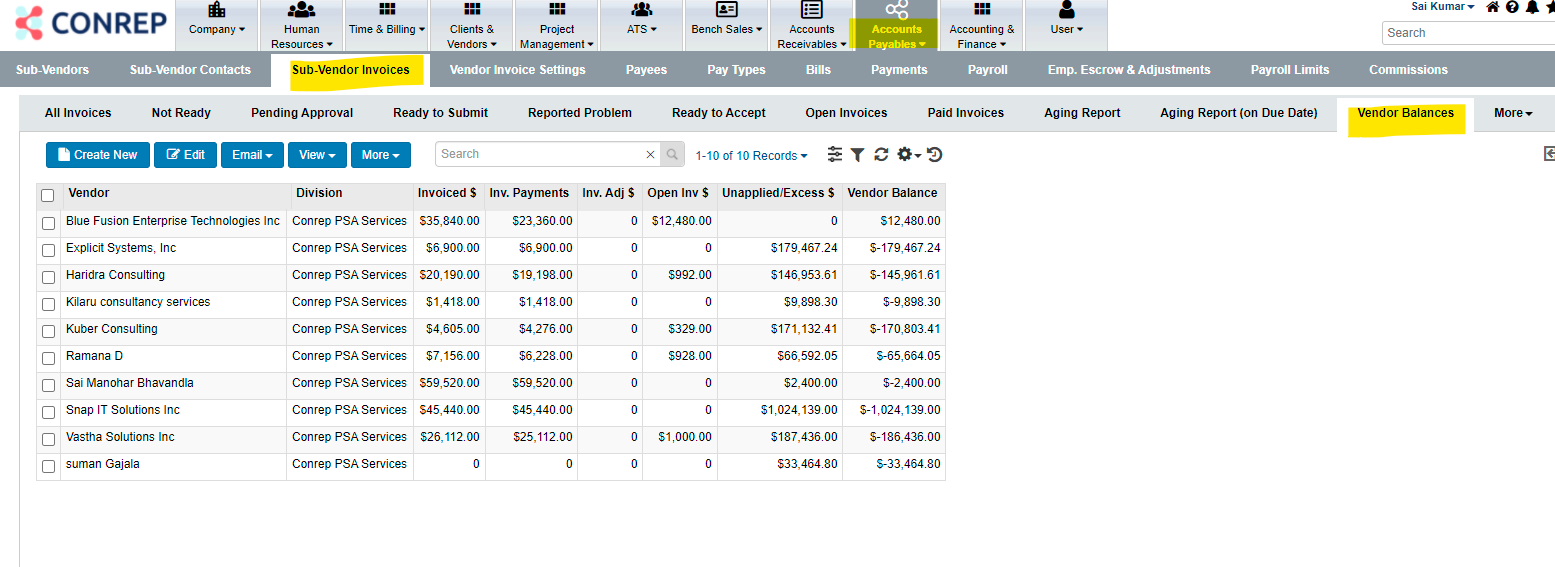
Aging Report
Aging reports are based on 2 criteria’s, one is based on Invoice Date and the other is based on Invoice Due Date.
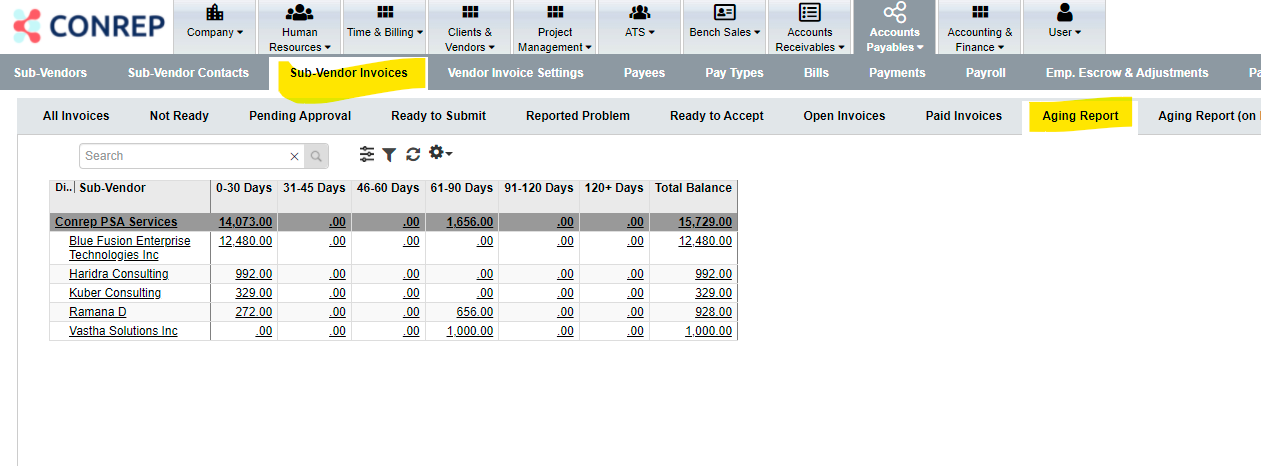
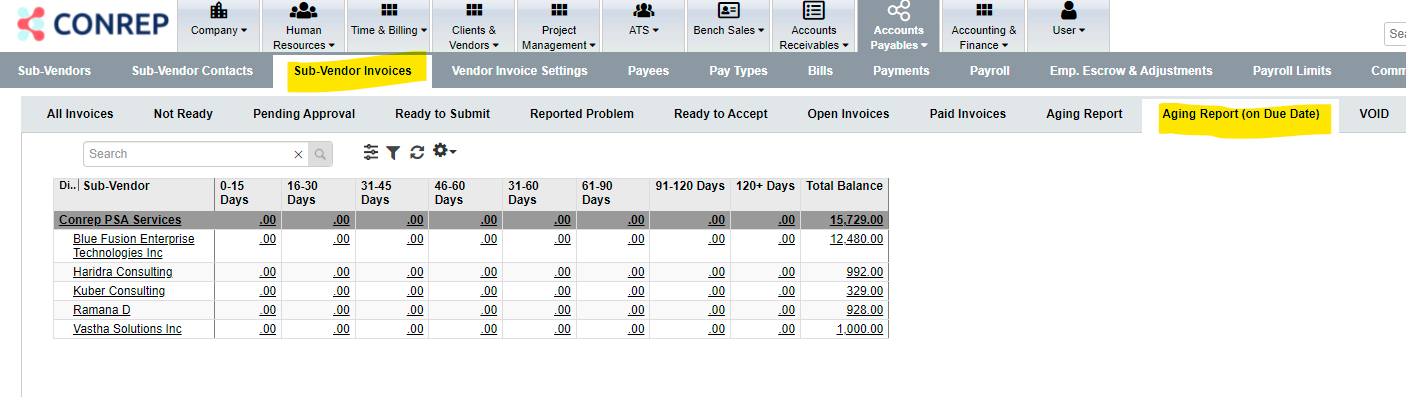
Both Reports indicate period based aging data of pending open invoices.
Vendor Balance Report would help you in reconciliation of payments.
If you need assistance, please email support@conrep.com and we will be glad to assist you (or) you can reach out to your account manager for any clarification.
Client, Client Contact, End Client Module
Client Module:
- Client & Client Contacts Module Overview
- Add New Client and a Client Contact
Client & Client Contacts Module Overview:
Every staffing company would receive requirement from Clients/ Tier 1 Vendors/Implementation partner. When a candidate is confirmed by them, there will be an MSA in place and a PO issued for the Consultant to start on the project.
All clients with whom an MSA is signed would have Status mentioned as “ACTIVE” customer and Sub Status mentioned as Active Billing.
Rest of the Status like, lead & prospect can be used for CRM activities to convert a prospective client to an Active Client.
Add New Client and a Client Contact
Go to Client & Vendor (Main Menu) -> Client -> default report will be “All Companies” -> Click on CREATE NEW button to add a new Client Record.

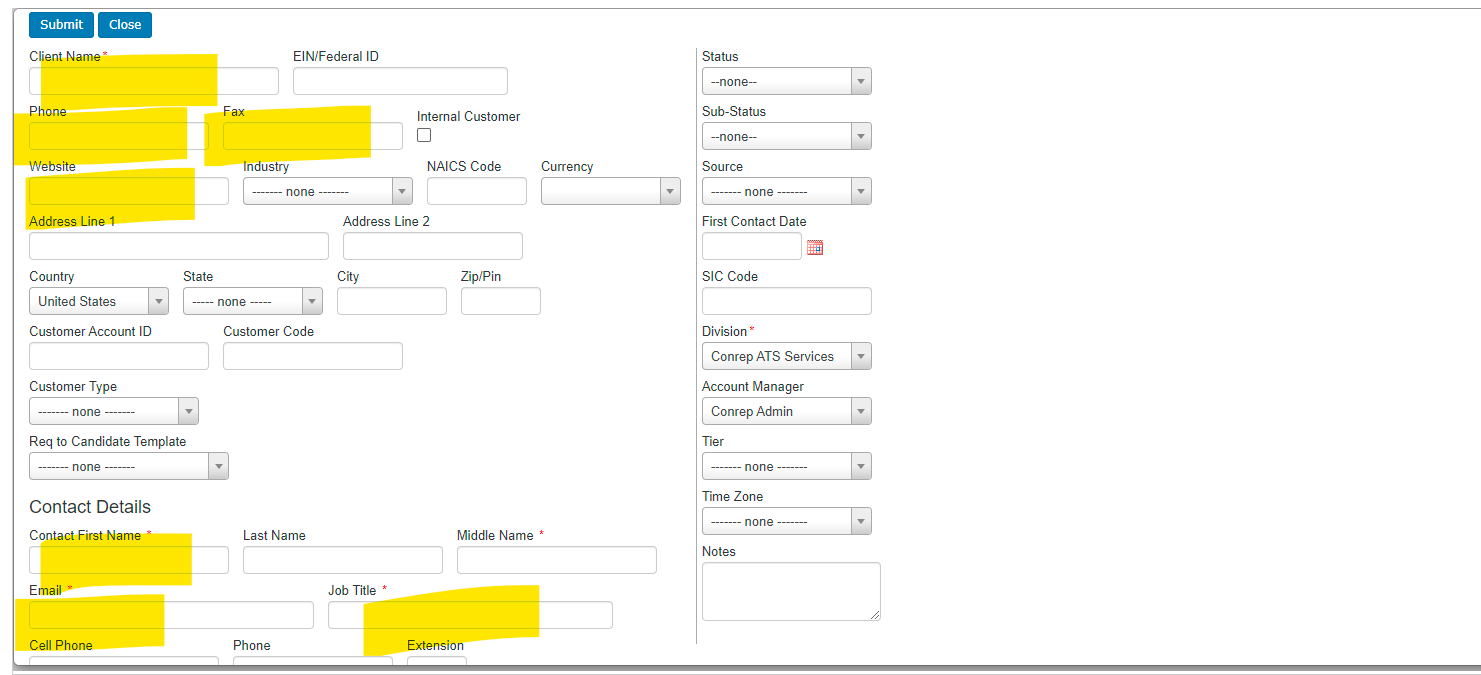
When you are adding a Client, the screen will prompt you to add one Client Contact. If you need to add more Client contacts then, please SAVE/SUBMIT the screen and you will routed to the Client Display Screen.
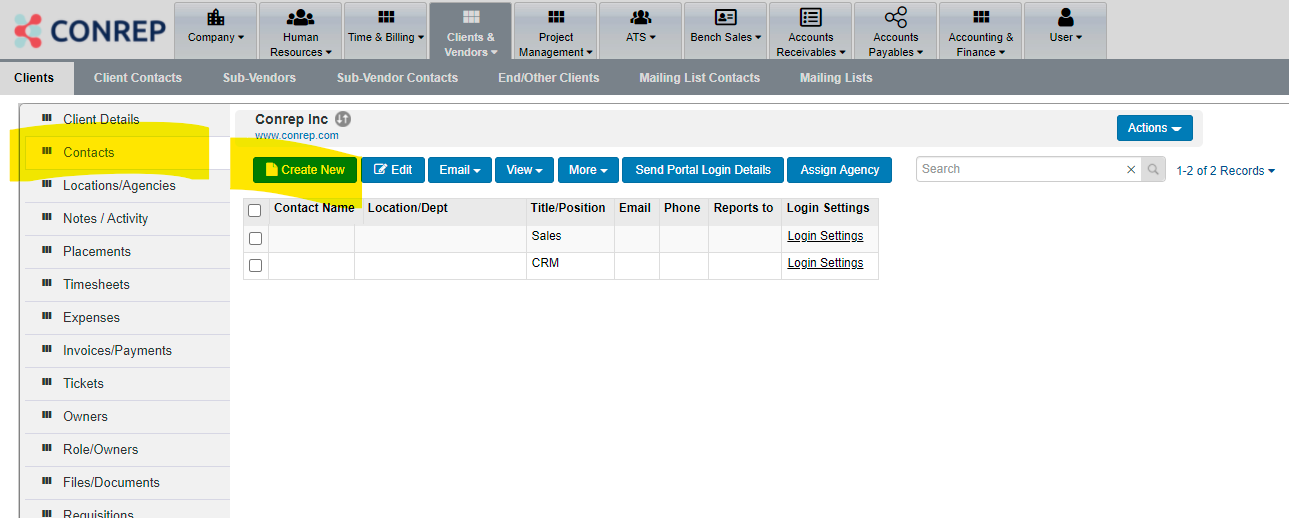 Click on the Contacts TAB and Use the Create New option to create a new Client contact in the system
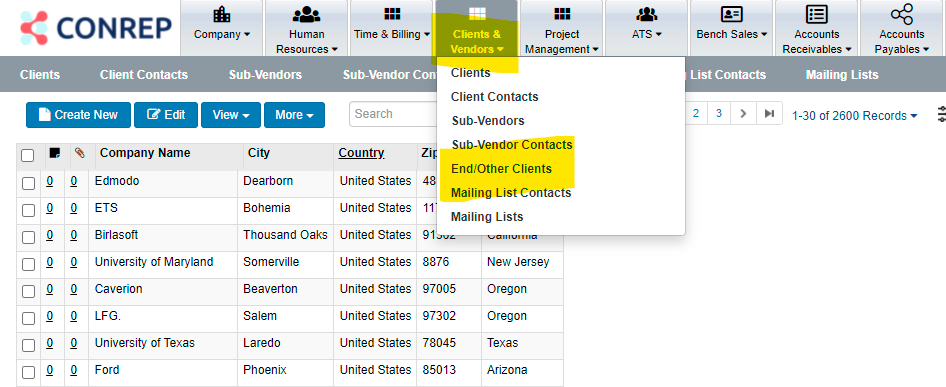
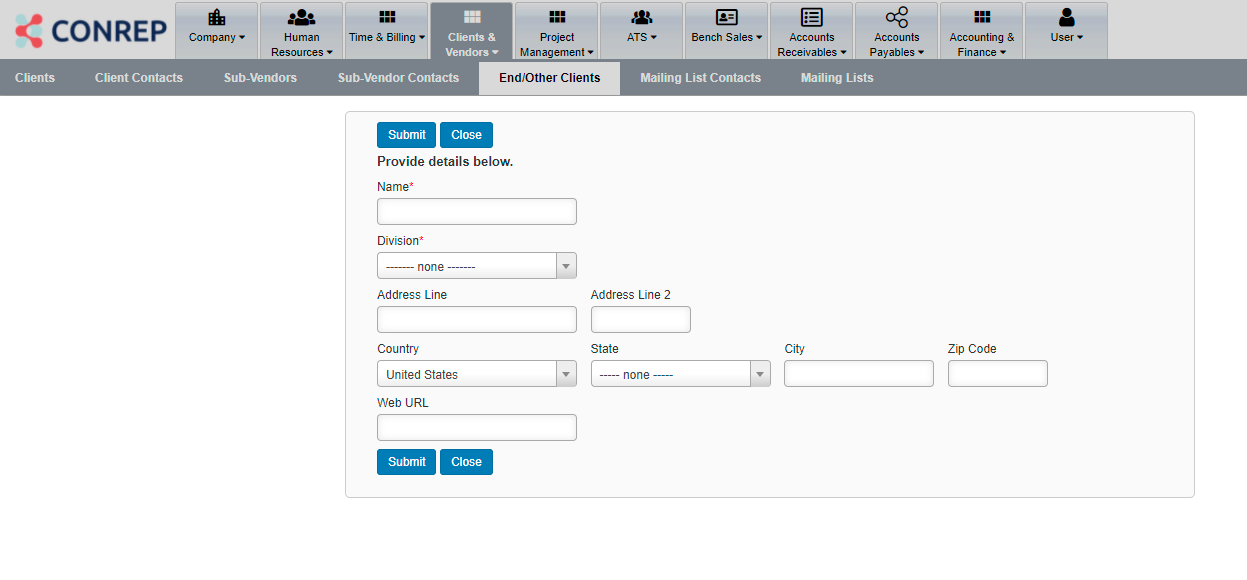
End Client/Other Client is managed separately to track where the consultant is actually working which leads to future business.
To track End Client/ Other Client -> Go to Client & Vendors (main menu) -> Click on End/Other client ->Use Create new option to add a new End/Other client to the system.
LinkedIn Job Posting Integration
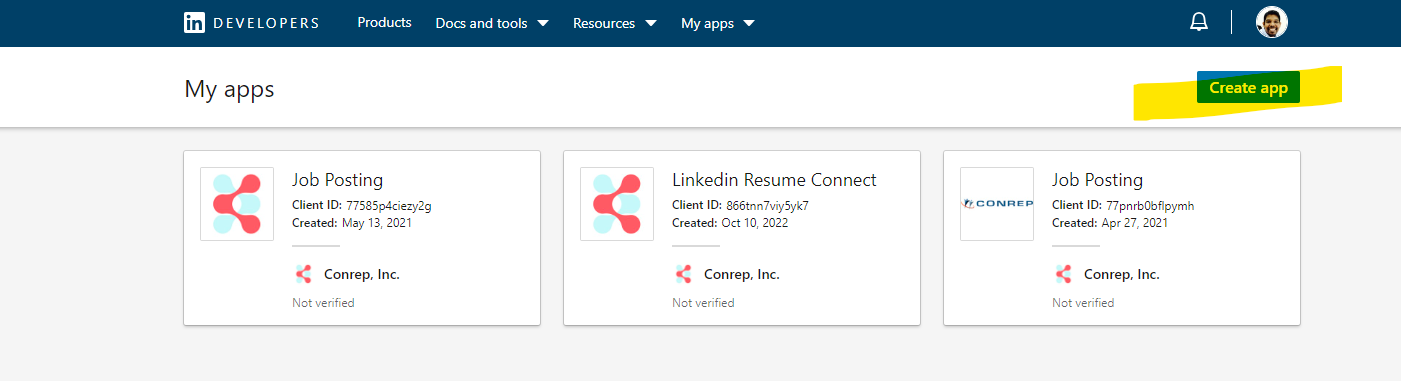
Step 1: Enter the URL as https://developer.linkedin.com/ and sign in to the account.
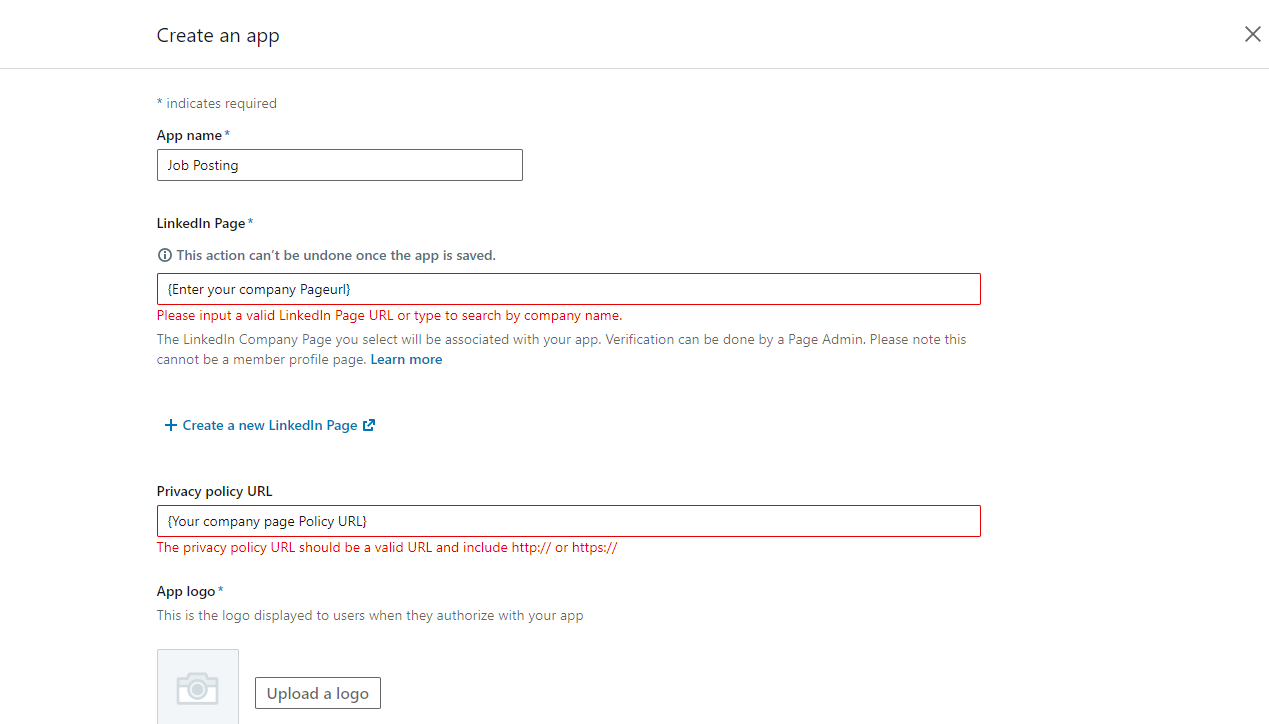
Step 2: Click on Create App
Step 3: Please update the information as requested.
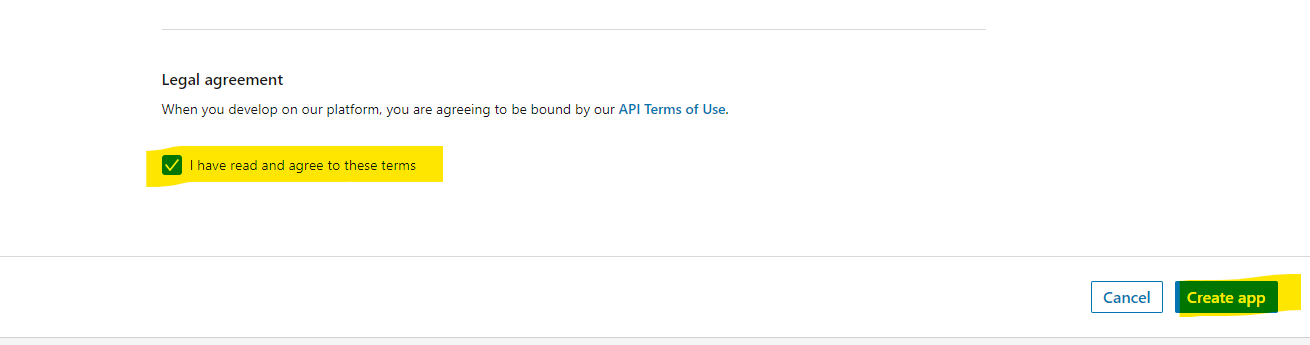
Step 4: Agree to Terms and Click on Create APP.
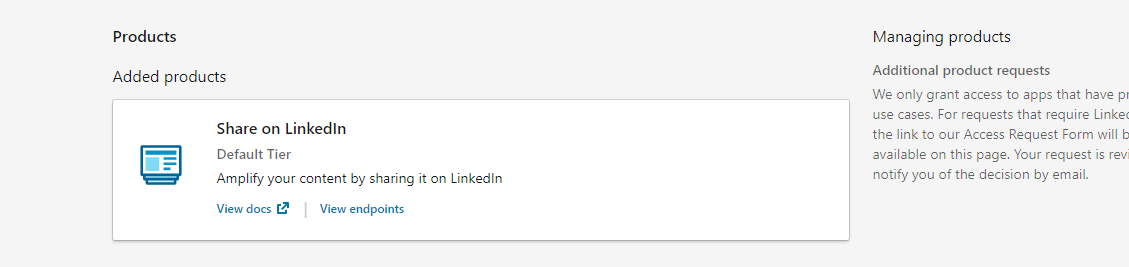
Step 5: Click on Request Access Button on the Products Tab.
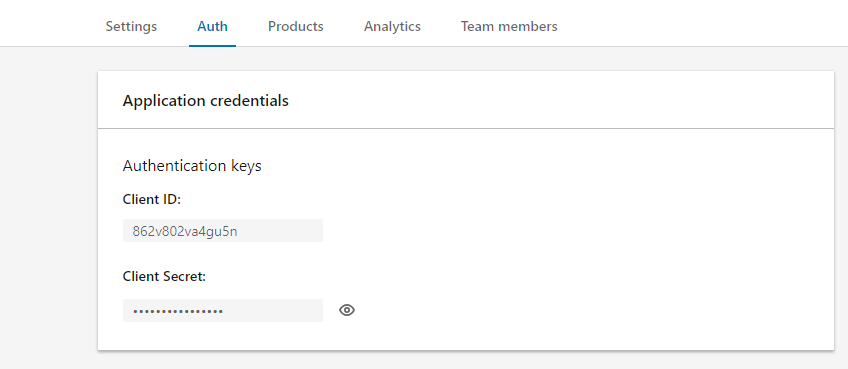
Step 6: You will find the Client ID and Secret Key Under AUTH Tab,
Step 7: In the Conrep LinkedIn Integration Page.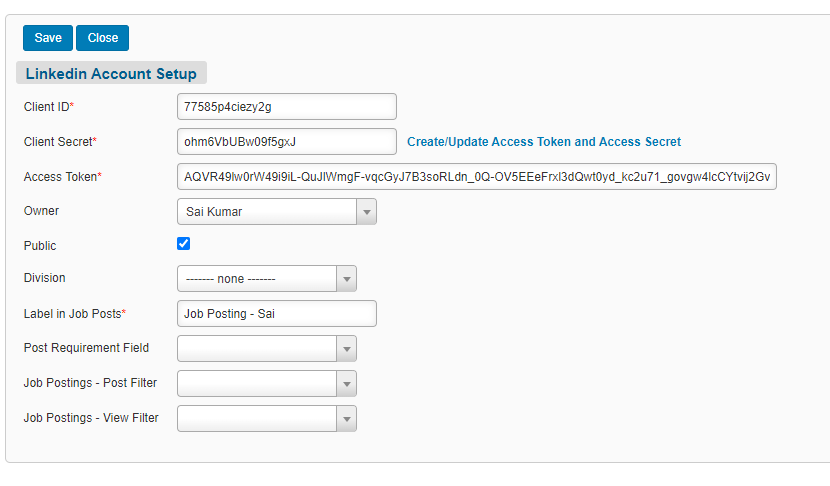
Copy the Client ID and Secret Key and click on Click on “Create/Update Access token and Access Secret”.
This will generate an Access Token which needs to updated on the Page and SAVE.
Step 8:
Once done, you can post a LinkedIn post from Conrep and you will see it under.
Posts & Activity in LinkedIn.
Employee Portal
Introduction to Employee Portal
- Projects: Current & Past Projects Information
- Timesheets: Working with Timesheets and the Submission process.
- Approve Timesheet: How to access Timesheets submitted to approvers
- Status Reports: Updating and Submitting Status reports
- Expenses: Submitting Expense Reports
- Time off: Requesting Time off and view accrual balances
- User: Information related to User profile, documents Account Summary etc.
- Help: Guide to access and work on self service portal, additional documents for review
Employee Portal is the Self-Service access given to manage and view contractor/Employee, projects, submit & view status of Timesheets, Submit Status reports to reporting managers, apply for Time off Request, update emergency contacts, view salary information,
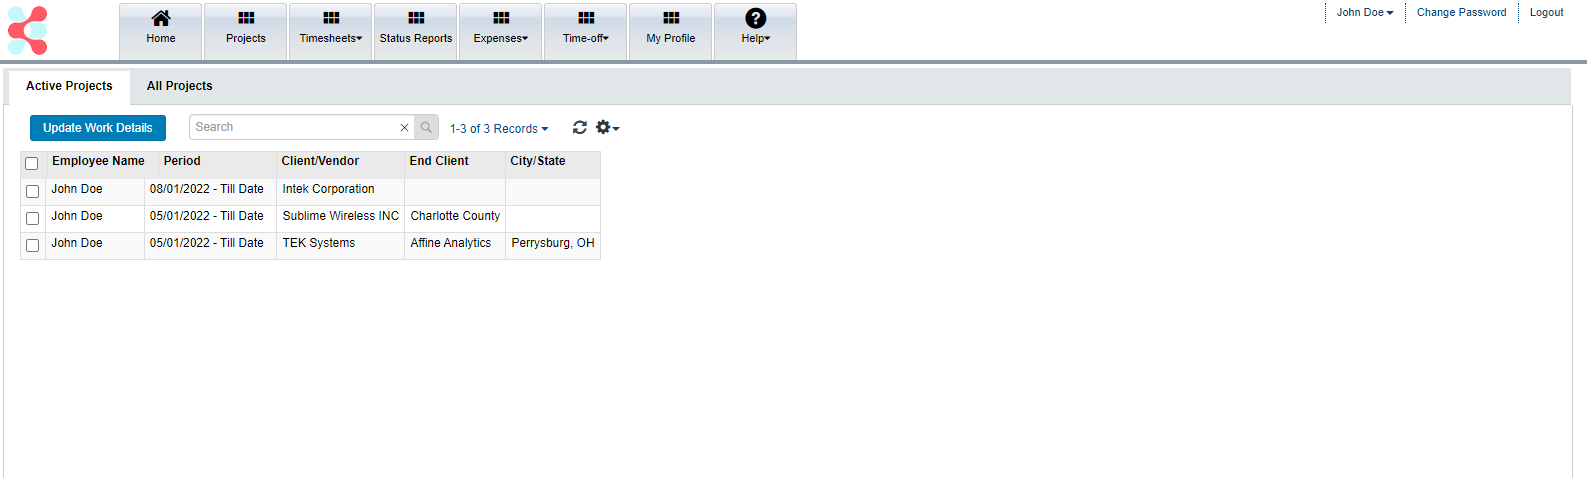
Projects:
This will list all project currently being executed and also any projects which were completed.
We will be able to view the start date of the project, the client for whom the project was executed and the state and city of the Client.
 Timesheets:
Contractors/Employees who are currently on projects would update their worked hours on the self-service portal and would upload the Approved Timesheet copy from their peers at work location. In case of 1099 Vendors, you can submit your timesheet from this section and the same can be approved by Unica Team timesheets team based on which the Invoices will be raised.
The Timesheet section will have New Timesheets, Pending Approval, Accepted & Rejected Timesheets buckets to track timesheets in different status.
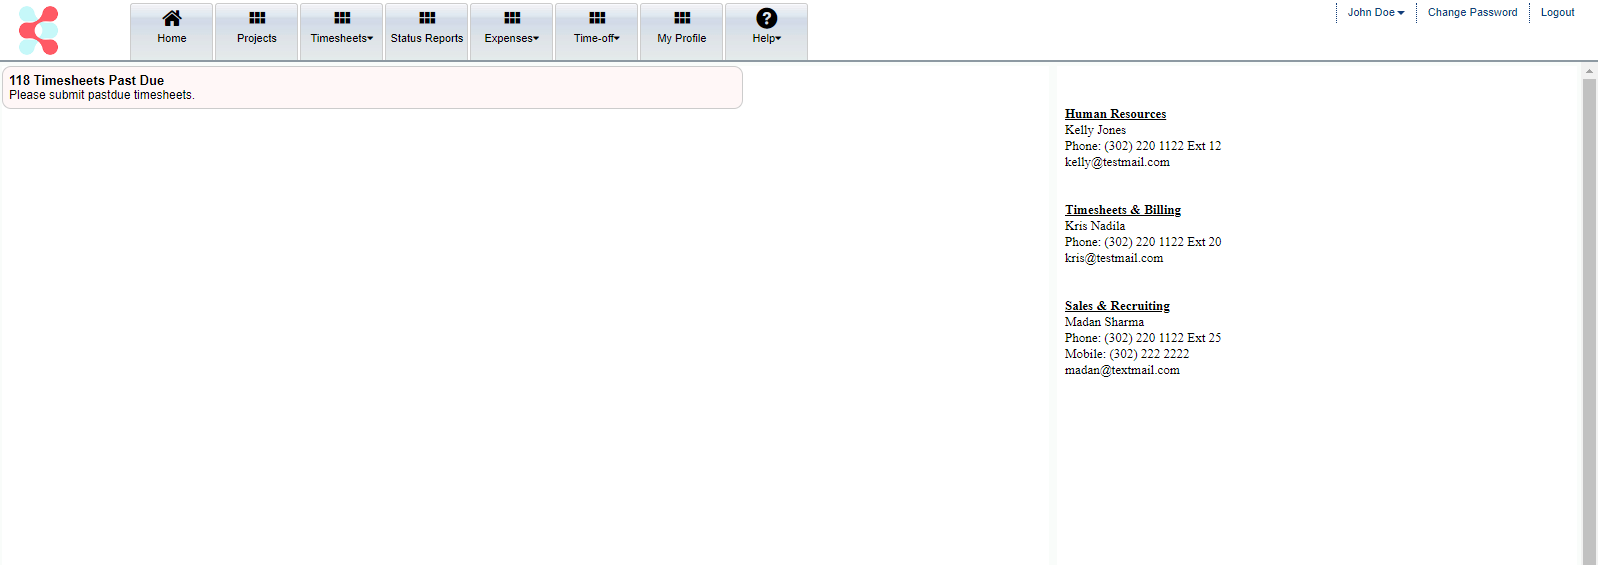
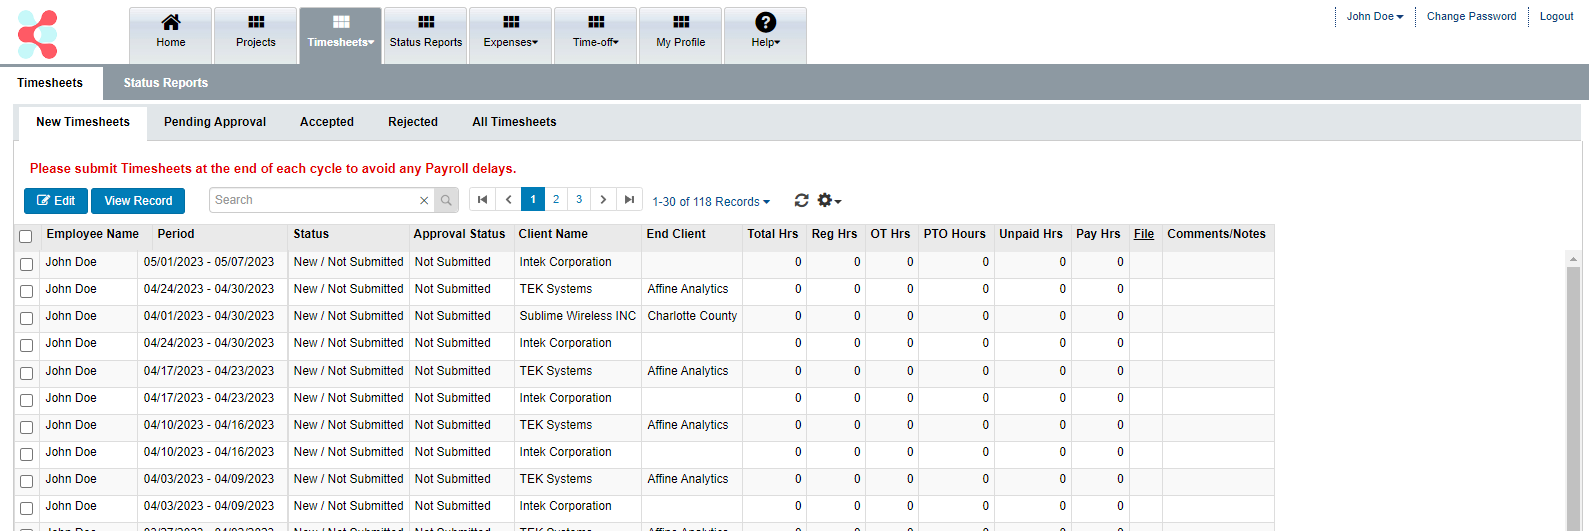 New Timesheets: These are current week or Past Due timesheets which are yet to be Submitted
Pending Approval: These are timesheets which are yet to be approved after submission.
Accepted: Timesheets which have been approved by Timesheet team @ Unica Group.
Rejected: If the Hours entered and the attachment is not matching the timesheet will be in Rejected status and needs to be submitted again.
All Timesheets: This will list timesheets for all consultants on project based on all the above mention status.
Submit Timesheet:
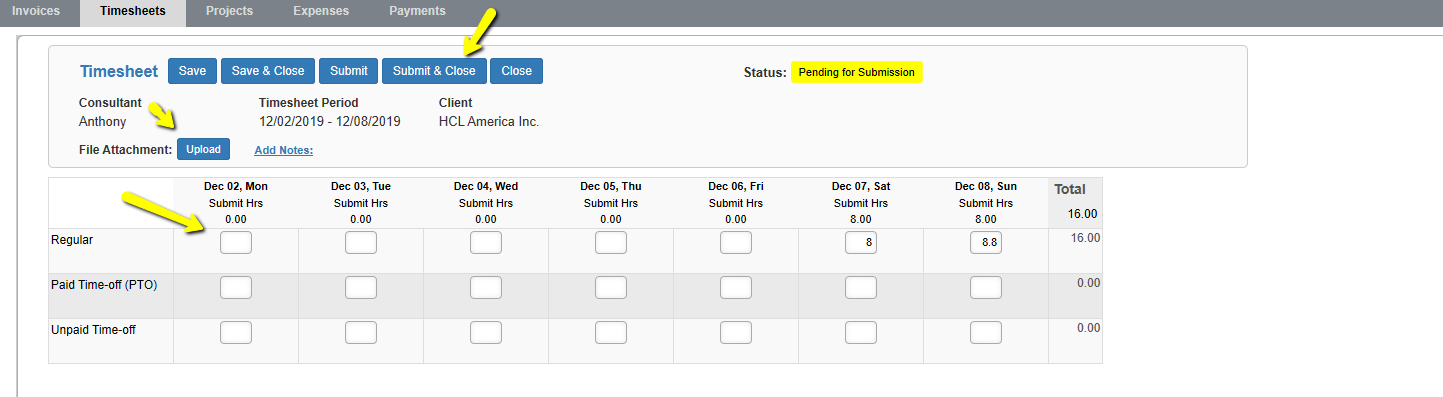
To Submit Timesheet, please Select the Timesheet and click EDIT or Double click on the Timesheet which will all user to record time/Hours for each workday.
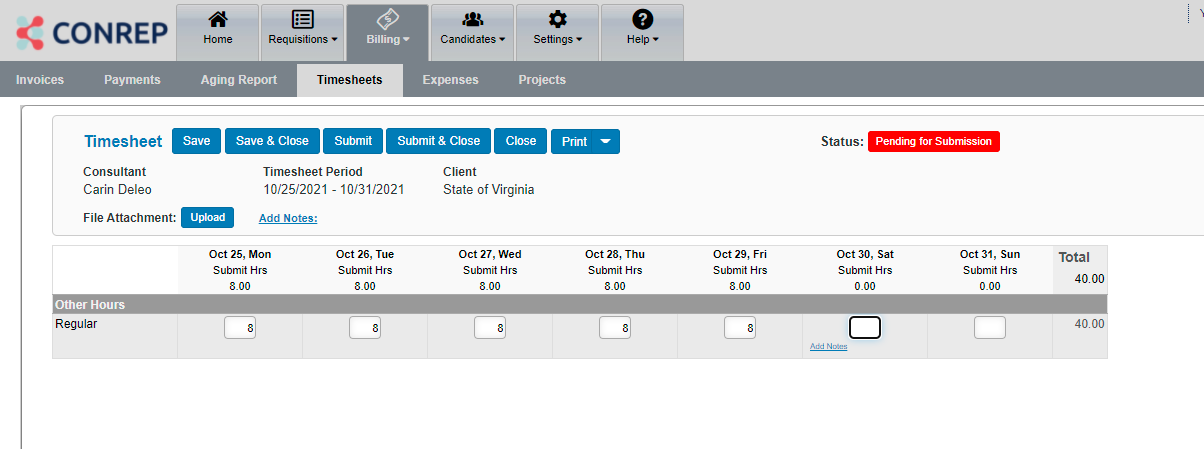
The hours can be entered on minutes and the system will convert the hours in fraction of 100 for ease of calculation. User are expected to enter hours as Hours and Minutes like 7 HR : 30 Min and the system will calculate it as 7.50 hours.
Please make sure to upload the Timesheet document using the UPLOAD option, the hours entered should match the hours in the attachment for approval from E-Solutions Inc Team.
Approve Timesheet: How to access Timesheets submitted to approvers
If we would need to approve Timesheets for team members, please follow the below path.
My TEAM (Main Menu) à Pending Approval (All)
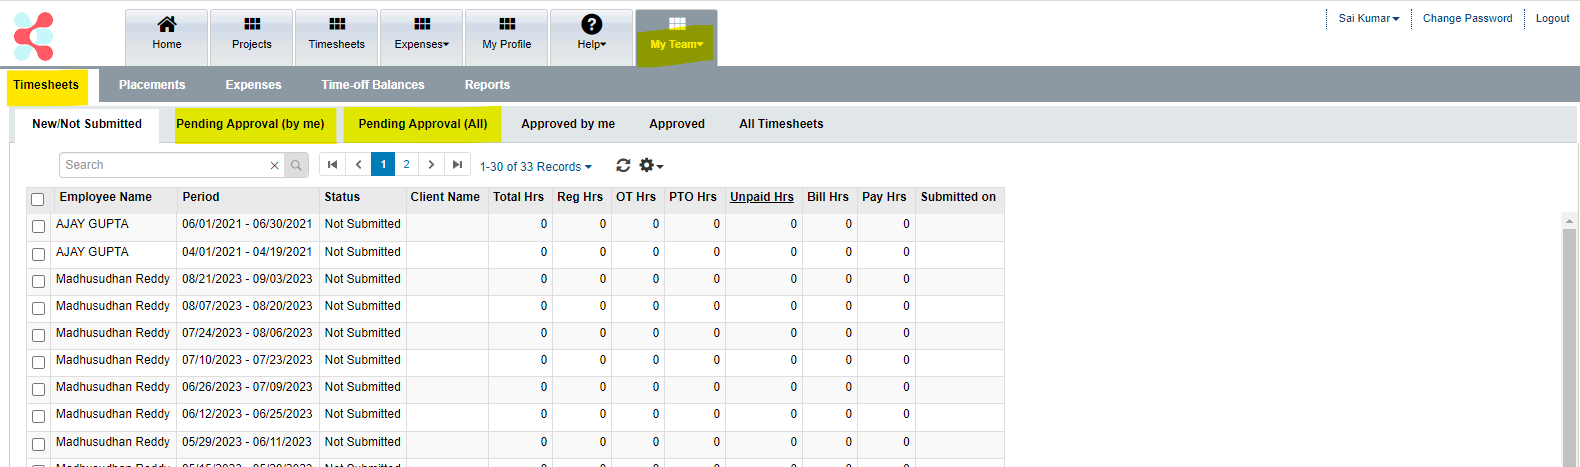
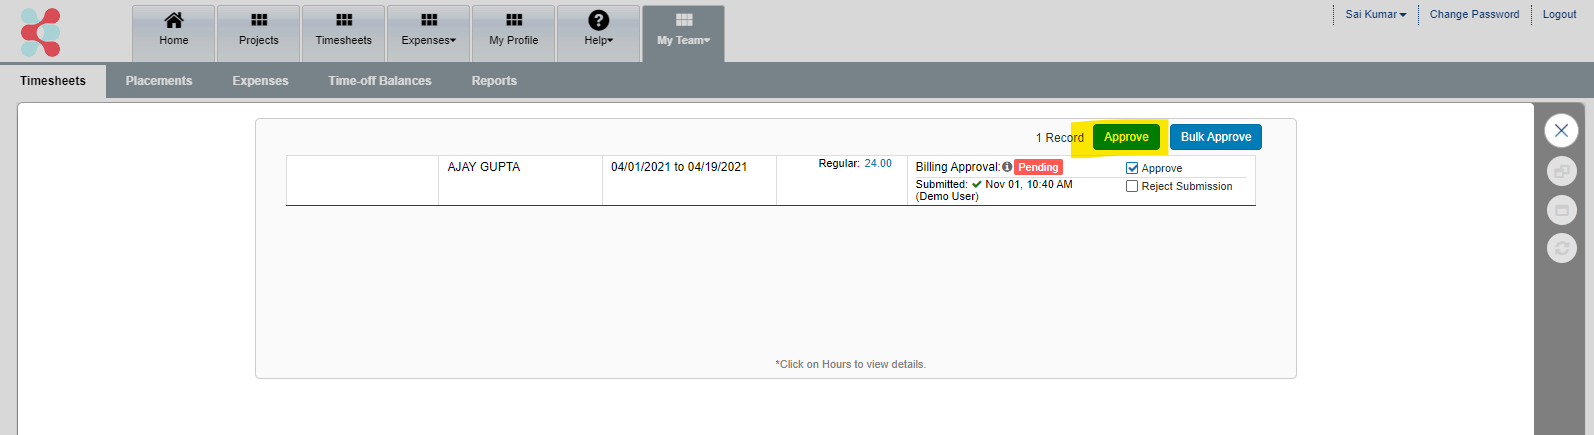
Select the Timesheet and click the approve button:
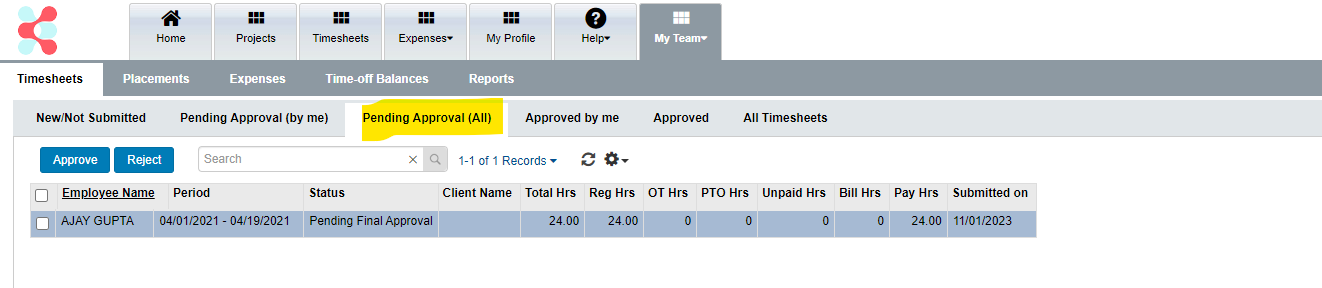
Select the Approve Check box and HIT Approve button to Approve the Timesheet.
EXPENSES:
You can Submit and Track your Expenses from this Tab
a. Add Expense: You can use Add Expense option, it will allow you to create an expense as shown below.
You can add an expense items for specific dates by selecting the DateRange link to expand the date range and select the category, enter the amount, add the notes and upload the expense file as shown above. The Cumulative expense amount can be seen above in the figure.
You can attach a consolidated expense file through the Browse button and use the Submit button to submit the Expense as shown above in the figure. You also have privilege to save the expense and submit later using Save as Draft button.
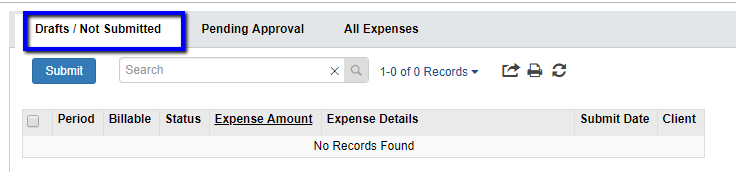
b. Drafts/Not Submitted: You can view all the not submitted / saved expenses to Submit in this report.
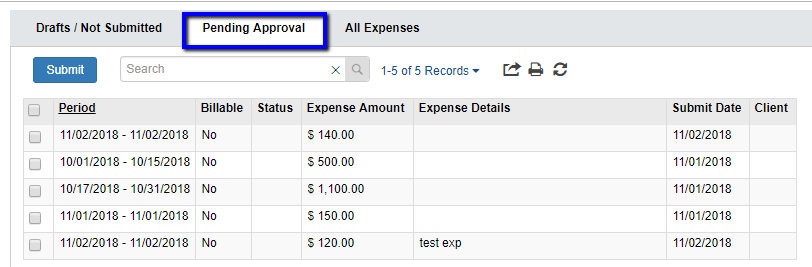
c. Pending Approval: Pending approval will show all the Submitted Expenses by the consultant with status as submitted.
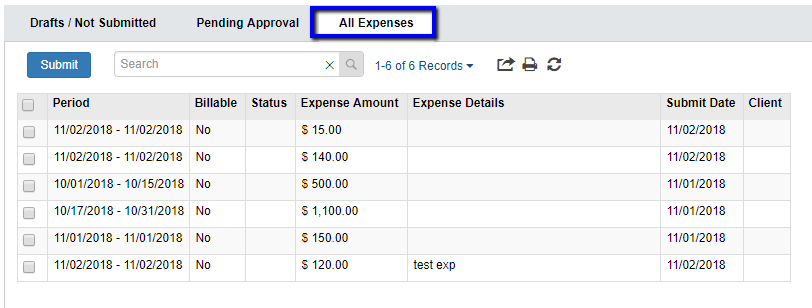
a. All Expenses: You can view all the Expenses in this report with different status as submitted, Approved and Rejected.
 Once the hours are verified and attachment uploaded please hit the SUBMIT button, this action will trigger an email to the Timesheet administrators that the timesheet has been submitted to them for approval.
When a Timesheet is Rejected the Vendor/Employee/Contractor would also receive an email to notify the reason of Rejection and necessary corrective action to be taken.
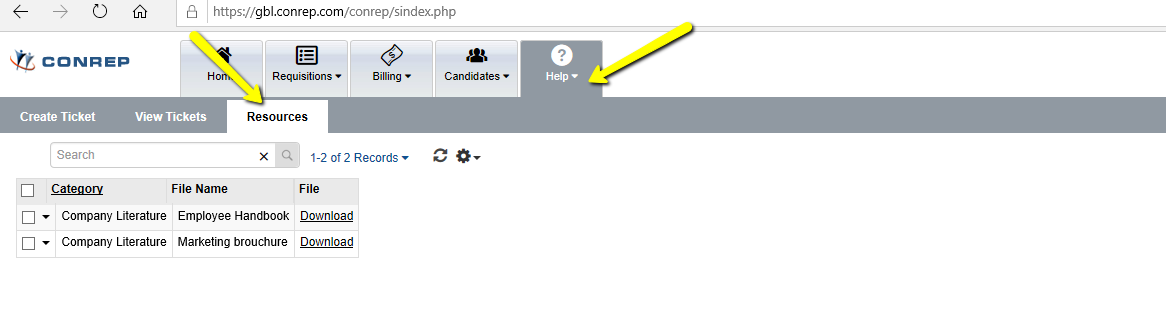
HELP:
Resources:
Document formats for ACH, Invoice format can be downloaded from this section.
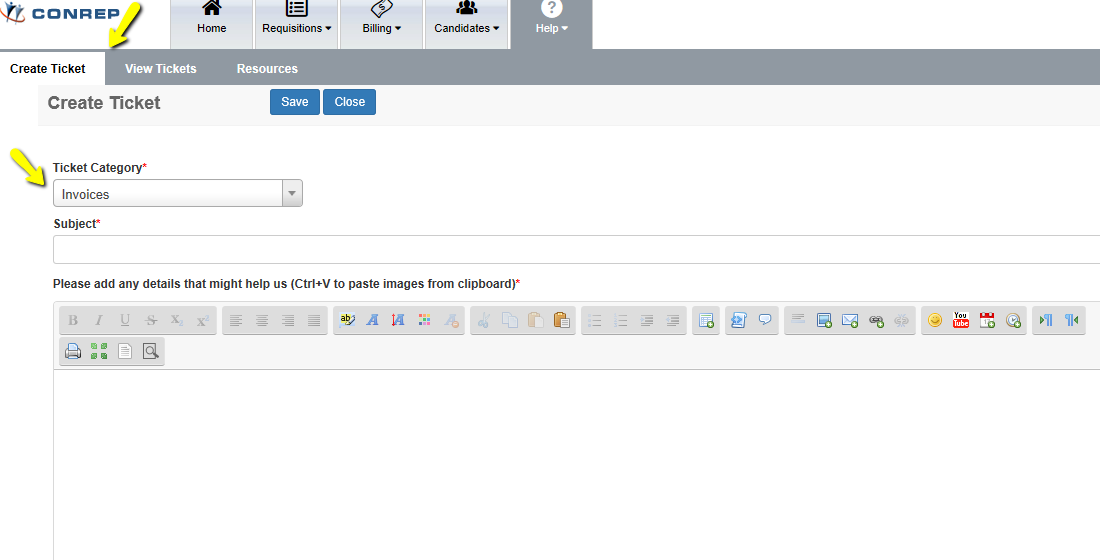
Tickets:
You can also raise tickets from your portal and track the status of the Tickets.